Keeping with tradition that we began last year, we are going to give our mothers a crochet purse. This year we opted for a flowers puff and the result seems to us to be a very fresh and modern purse.
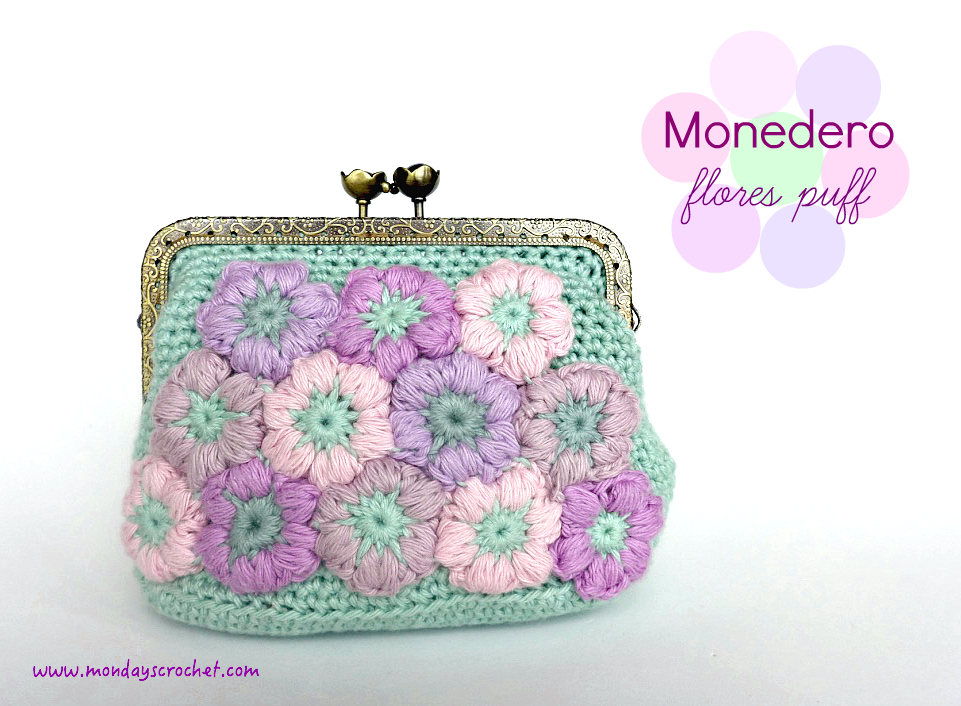
TUTORIAL PARA MONEDERO CON FLORES PUFF / CROCHETED PUFF FLOWER PURSE
GRADO DE DIFICULTAD
Medio
MATERIALES
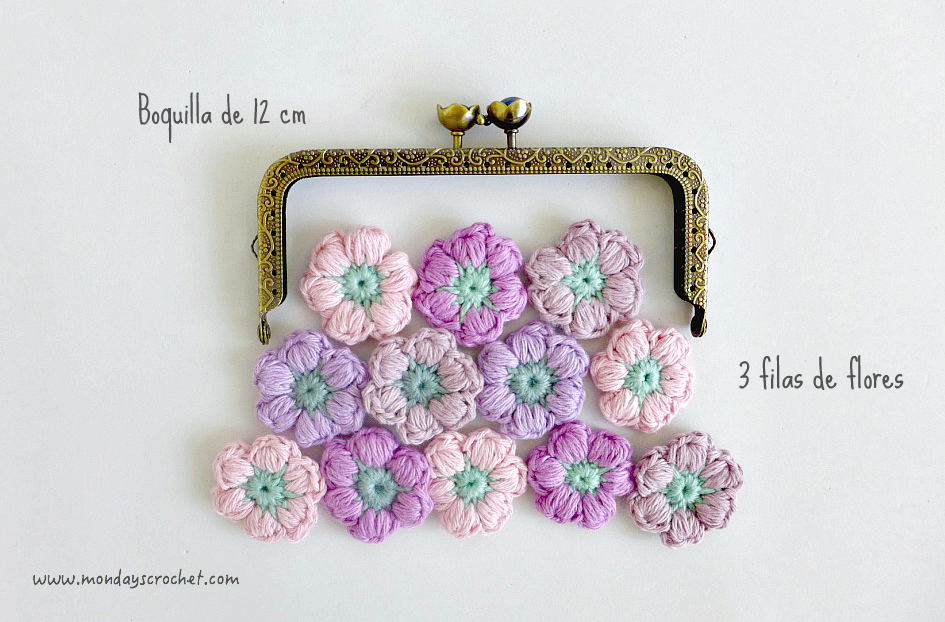
Boquilla de 12 cm
Hilo para coser marrón del color de la boquilla
Hilo de algodón color rosa para aguja número 3
Hilo de algodón color lila para aguja número 3
Hilo de algodón color malva para aguja número 3
Hilo de algodón color morado para aguja número 3
Hilo de algodón color verde claro para aguja número 3
Hilo de algodón color turquesa claro para aguja número 3
Aguja utilizada número 3
Aguja lanera
Tijeras
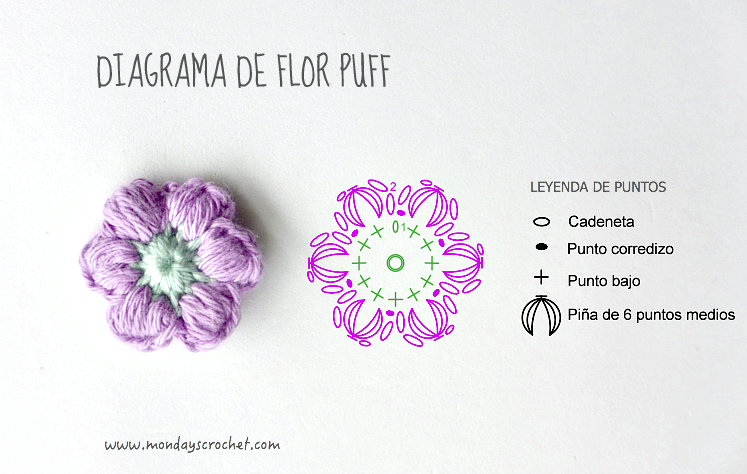
PUNTOS DE CROCHET UTILIZADOS
Anillo mágico
Cadeneta (c.a.d.)
Punto corredizo (p.c.)
Punto bajo (p.b.)
Punto bajo tejido en la lazada trasera (p.b. tejido en la lazada trasera)
Punto piña de 6 puntos medios (piña 6 p.m.)
DIFFICULTY
Medium
MATERIALS
Mouthpiece 12 cm
Brown thread to sew the mouthpiece
Pink cotton for hook number 3
Lilac cotton for hook number 3
Mauve cotton for hook number 3
Purple cotton for hook number 3
Turquoise cotton for hook number 3
Hook used number 3
Wool needle
Scissors
CROCHET STITCHES
Magic ring
Chain (ch)
Slip stitch (sl st)
Single crochet (sc)
Back post single crochet (BPsc)
Puff stitch of 6 half double crochet (Ps6)
FLOR PUFF DE CROCHET / PUFF FLOWER
Vamos a comenzar haciendo las flores.
Let’s start with the flowers.
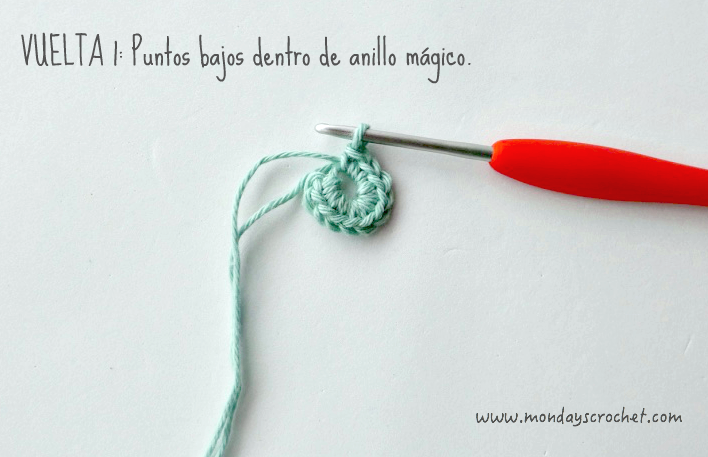
En color verde.
VUELTA INICIAL: Anillo mágico.
VUELTA 1: Tejemos 1 c.a.d de subida que cuenta como 1 p.b. y 11 p.b. dentro del anillo mágico. En total 12 p.b.
In green.
FOUNDATION ROW: Magic ring.
ROW 1: 1 ch that counts as 1 sc and y 11 sc in the magic ring. 12 sc in total.
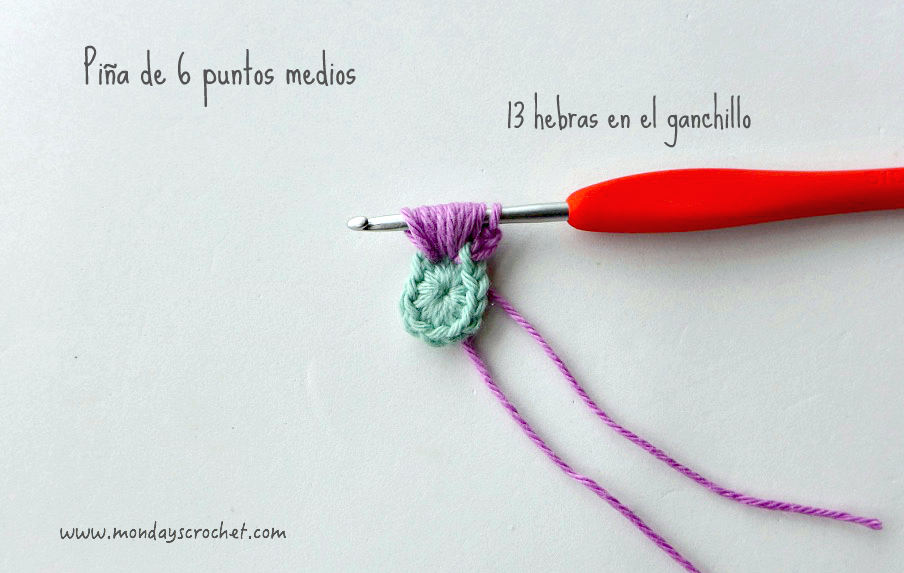
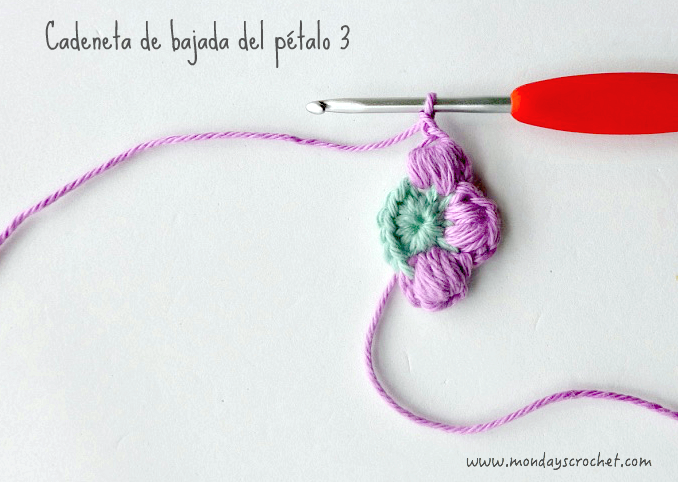
Antes de hacer el p.c. de cierre cambiamos a uno de los colores elegidos para las flores y cerramos.
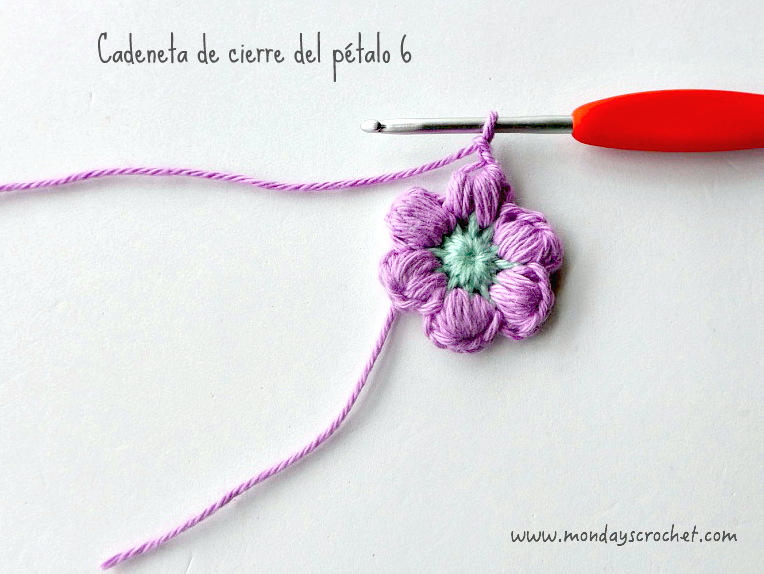
VUELTA 2: Tejemos 2 c.a.d. de subida y 1 punto piña de 3 p.m. Sin cerrar, tejemos otro punto piña de 3 p.m. en el siguiente p.b. de la vuelta anterior. Tenemos 13 hebras en el ganchillo. Echamos hebra y la sacamos por todos los p.m. Cerramos con 1 c.a.d. de cierre. Tejemos 1 c.a.d. de bajada. Terminamos el primer pétalo con 1 p.c. en el mismo p.b. Repetir 5 veces más. En total 6 pétalos.
Before closing the sl st change to one of the colors chosen for the flowers and fasten off.
ROW 2: 2 ch to start the row and 1 puff stitch of 6 hdc. Without fasten off, make another puff stitch of 3 hdc in the next sc of the previous row. We have 13 loops on the hook. Yarn over and pull through all of them. Fasten off with with 1 ch. 1 ch. Finish the first petal with 1 sl st in the same sc. Repeat 5 more times. 6 petals in total.
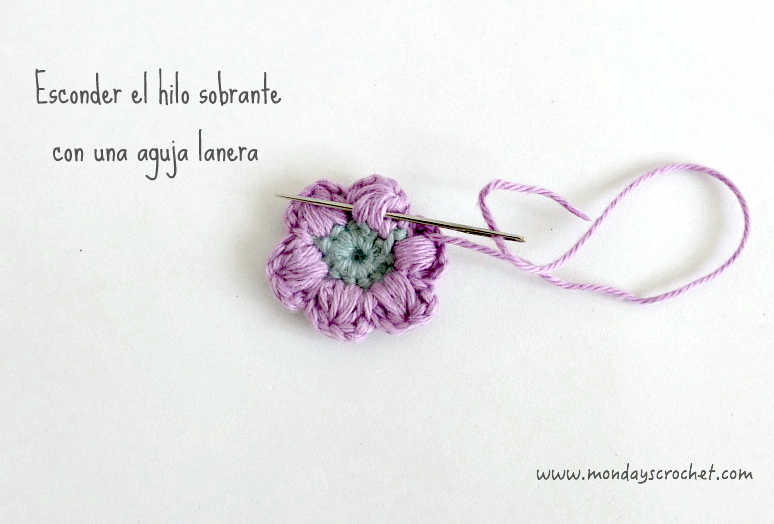
Rematamos la flor, escondiendo el hilo por el revés con una aguja lanera y cortamos con las tijeras el hilo sobrante.
Fasten off and weave in ends with the wool needle.
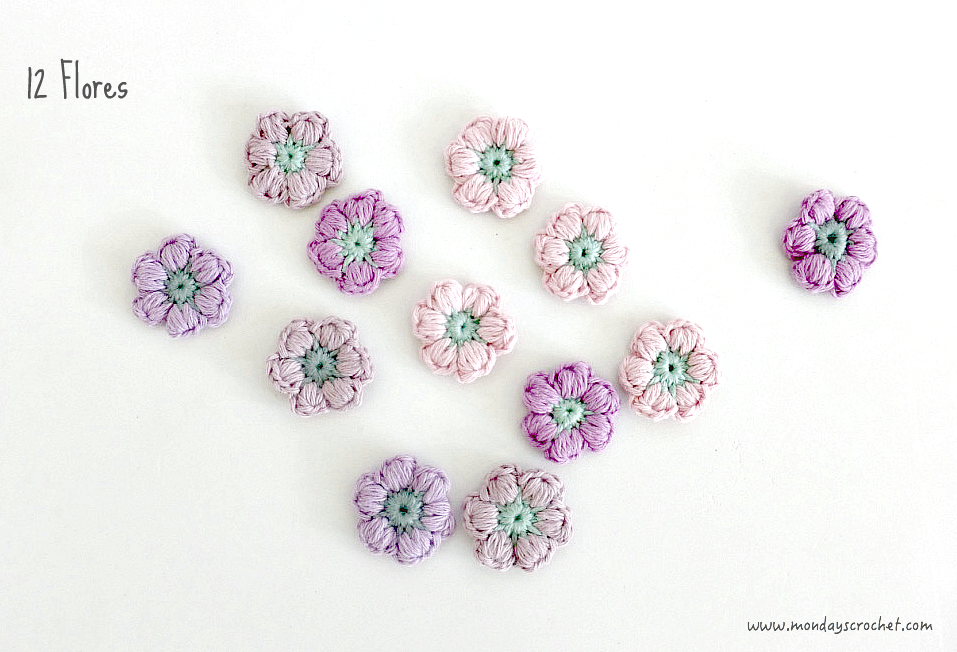
Necesitamos 12 flores para cubrir toda la parte delantera del monedero.
We need 12 flower to cover the front of the purse.
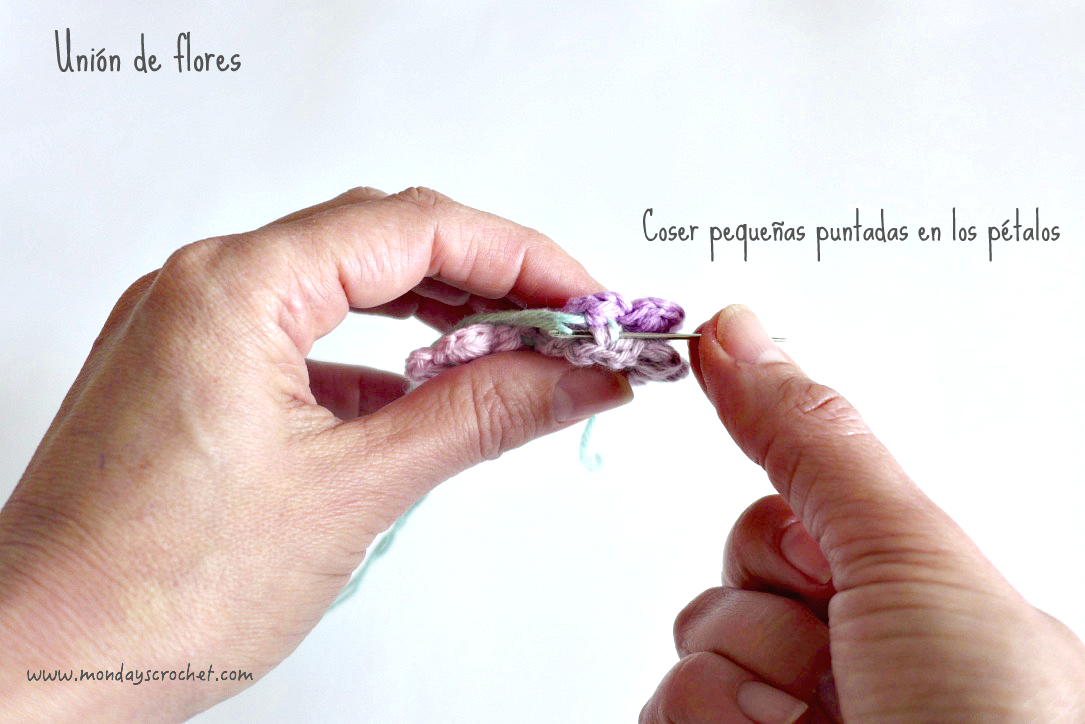
UNIÓN DE LAS FLORES / JOIN TOGETHER THE FLOWERS
Formamos 3 filas que cubran la parte delantera del monedero. 3 flores en la parte superior, 4 en la fila central y 5 en la parte inferior.
Form 3 rows covering the front of the purse. 3 flowers on top, 4 in the middle and 5 at the bottom.
Para unir las flores entre sí cosemos los pétalos de las dos flores que queremos unir con pequeñas puntadas en la parte más abultada.
To attach the flowers together sew the petals of the two flowers that we want to join with small stitches in the bulkiest part.
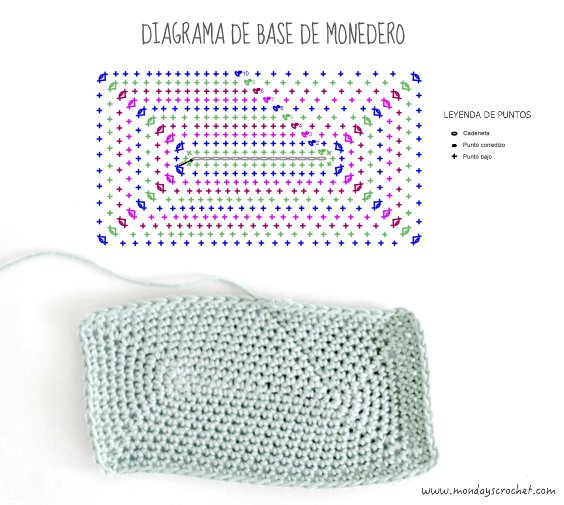
BASE RECTANGULAR DE MONEDERO / RECTANGULAR PURSE BASE
Comenzamos el monedero por su base. hemos decidido darle forma rectangular para que las flores estén en el plano delantero de uno de los lados mayores.
Start the purse at its base. We have decided to give a rectangular shape to give the flowers more space.
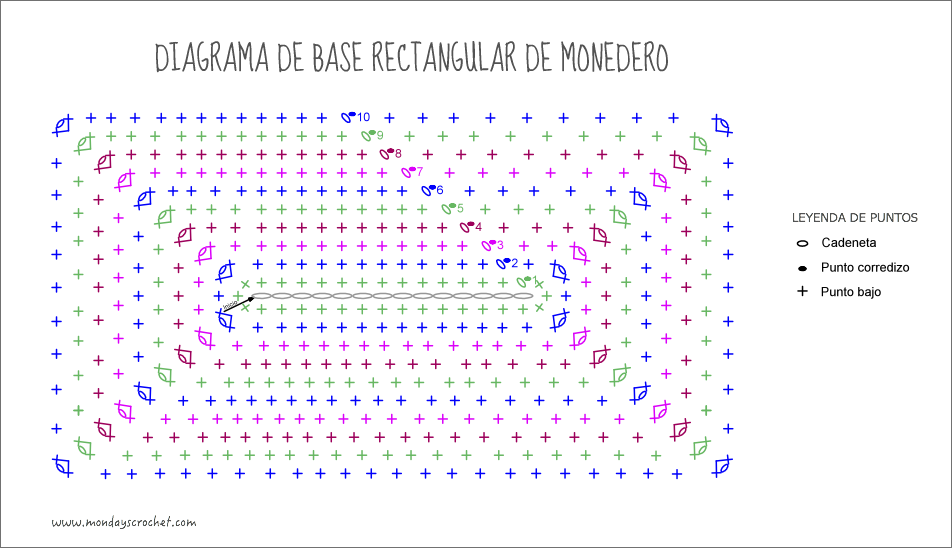
VUELTA INICIAL: Tejemos una c.a.d inicial de 14 puntos.
VUELTA 1: Tejemos 1 c.a.d. de subida y 12 p.b. en la c.a.d. de la vuelta inicial. En la c.a.d. de inicio tejemos 5 p.b. Continuamos por el otro lado de la c.a.d. inicial tejiendo 12 p.b. En el extremo de nuestra c.a.d. tejemos 4 p.b. Cerramos en la c.a.d. de subida con 1 p.c.
VUELTA 2: Tejemos 1 c.a.d. de subida y 12 p.b. en cada p.b. de la vuelta anterior. A continuación un aumento (p.b c.a.d p.b.), 1 p.b. en el siguiente p.b., 1 aumento (p.b. c.a.d. p.b.) Seguimos con 14 p.b., aumento, 1 p.b., aumento, 1 p.b. Cerramos en la c.a.d. de subida con 1 p.c.
VUELTA 3: Tejemos 1 c.a.d. de subida y 12 p.b. en cada p.b. de la vuelta anterior. A continuación un aumento (p.b c.a.d p.b.), 2 p.b. en el siguiente p.b., 1 aumento (p.b. c.a.d. p.b.) Seguimos con 15 p.b., aumento, 2 p.b., aumento, 2 p.b. Cerramos en la c.a.d. de subida con 1 p.c.
VUELTA 4: Tejemos 1 c.a.d. de subida y 12 p.b. en cada p.b. de la vuelta anterior. A continuación un aumento (p.b c.a.d p.b.), 3 p.b. en el siguiente p.b., 1 aumento (p.b. c.a.d. p.b.) Seguimos con 16 p.b., aumento, 3 p.b., aumento, 3 p.b. Cerramos en la c.a.d. de subida con 1 p.c.
VUELTA 5: Tejemos 1 c.a.d. de subida y 12 p.b. en cada p.b. de la vuelta anterior. A continuación un aumento (p.b c.a.d p.b.), 4 p.b. en el siguiente p.b., 1 aumento (p.b. c.a.d. p.b.) Seguimos con 17 p.b., aumento, 4 p.b., aumento, 4 p.b. Cerramos en la c.a.d. de subida con 1 p.c.
VUELTA 6: Tejemos 1 c.a.d. de subida y 12 p.b. en cada p.b. de la vuelta anterior. A continuación un aumento (p.b c.a.d p.b.), 5 p.b. en el siguiente p.b., 1 aumento (p.b. c.a.d. p.b.) Seguimos con 18 p.b., aumento, 5 p.b., aumento, 5 p.b. Cerramos en la c.a.d. de subida con 1 p.c.
VUELTA 7: Tejemos 1 c.a.d. de subida y 12 p.b. en cada p.b. de la vuelta anterior. A continuación un aumento (p.b c.a.d p.b.), 6 p.b. en el siguiente p.b., 1 aumento (p.b. c.a.d. p.b.) Seguimos con 19 p.b., aumento, 6 p.b., aumento, 6 p.b. Cerramos en la c.a.d. de subida con 1 p.c.
VUELTA 8: Tejemos 1 c.a.d. de subida y 12 p.b. en cada p.b. de la vuelta anterior. A continuación un aumento (p.b c.a.d p.b.), 7 p.b. en el siguiente p.b., 1 aumento (p.b. c.a.d. p.b.) Seguimos con 20 p.b., aumento, 7 p.b., aumento, 7 p.b. Cerramos en la c.a.d. de subida con 1 p.c.
VUELTA 9: Tejemos 1 c.a.d. de subida y 12 p.b. en cada p.b. de la vuelta anterior. A continuación un aumento (p.b c.a.d p.b.), 8 p.b. en el siguiente p.b., 1 aumento (p.b. c.a.d. p.b.) Seguimos con 21 p.b., aumento, 8 p.b., aumento, 8 p.b. Cerramos en la c.a.d. de subida con 1 p.c.
VUELTA 10: Tejemos 1 c.a.d. de subida y 12 p.b. en cada p.b. de la vuelta anterior. A continuación un aumento (p.b c.a.d p.b.), 9 p.b. en el siguiente p.b., 1 aumento (p.b. c.a.d. p.b.) Seguimos con 22 p.b., aumento, 9 p.b., aumento, 9 p.b. Cerramos en la c.a.d. de subida con 1 p.c.
ROW 1: 1 ch to start the row and 12 sc in the chain of the first. In the first ch make 5 sc. Keep working on the other side of the initial ch making 12 sc. At the end of the ch make 4 sc. Fasten off with 1 sl st.
ROW 2: 1 ch to start the row and 12 p.b. in each sc of the previous row. 1 increase (sc, ch, sc), 1 sc in the next sc. 1 increase (sc, ch, sc.) 14 sc, increase, 1 sc, increase, 1 sc. Fasten off with 1 sl st.
ROW 3: 1 ch to start the row and 12 p.b. in each sc of the previous row. 1 increase (sc, ch, sc), 2 sc in the next sc. 1 increase (sc, ch, sc.) 15 sc, increase, 2 sc, increase, 2 sc. Fasten off with 1 sl st.
ROW 4: 1 ch to start the row and 12 p.b. in each sc of the previous row. 1 increase (sc, ch, sc), 3 sc in the next sc. 1 increase (sc, ch, sc.) 16 sc, increase, 3 sc, increase, 3 sc. Fasten off with 1 sl st.
ROW 5: 1 ch to start the row and 12 p.b. in each sc of the previous row. 1 increase (sc, ch, sc), 4 sc in the next sc. 1 increase (sc, ch, sc.) 17 sc, increase, 4 sc, increase, 4 sc. Fasten off with 1 sl st.
ROW 6: 1 ch to start the row and 12 p.b. in each sc of the previous row. 1 increase (sc, ch, sc), 5 sc in the next sc. 1 increase (sc, ch, sc.) 18 sc, increase, 5 sc, increase, 5 sc. Fasten off with 1 sl st.
ROW 7: 1 ch to start the row and 12 p.b. in each sc of the previous row. 1 increase (sc, ch, sc), 6 sc in the next sc. 1 increase (sc, ch, sc.) 19 sc, increase, 6 sc, increase, 6 sc. Fasten off with 1 sl st.
ROW 8: 1 ch to start the row and 12 p.b. in each sc of the previous row. 1 increase (sc, ch, sc), 7 sc in the next sc. 1 increase (sc, ch, sc.) 20 sc, increase, 7 sc, increase, 7 sc. Fasten off with 1 sl st.
ROW 9: 1 ch to start the row and 12 p.b. in each sc of the previous row. 1 increase (sc, ch, sc), 8 sc in the next sc. 1 increase (sc, ch, sc.) 21 sc, increase, 8 sc, increase, 8 sc. Fasten off with 1 sl st.
ROW 10: 1 ch to start the row and 12 p.b. in each sc of the previous row. 1 increase (sc, ch, sc), 9 sc in the next sc. 1 increase (sc, ch, sc.) 22 sc, increase, 9 sc, increase, 9 sc. Fasten off with 1 sl st.
ALZADO MONEDERO / PURSE ELEVATION
Vamos a realizar todo el alzado tejiendo en espiral.
Work in a spiral.
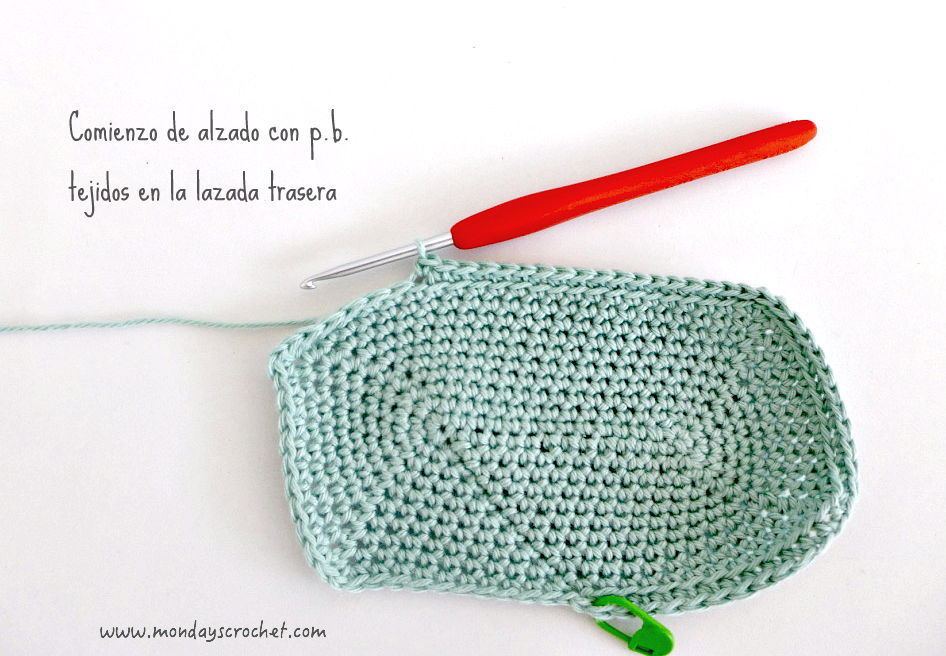
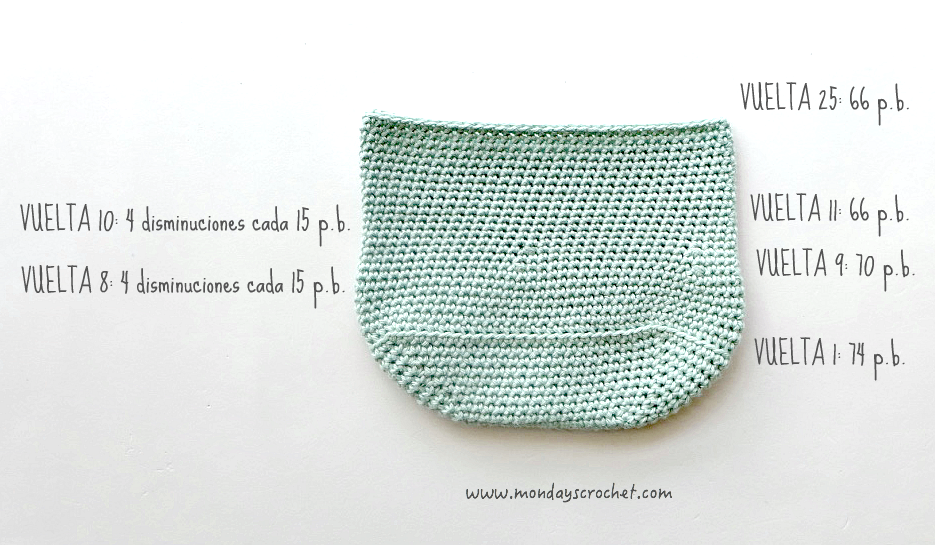
VUELTA 1: Comenzamos con 74 p.b. tejidos en la lazada trasera.
VUELTAS 2 a 7: Tejemos en espiral 74 p.b. en cada vuelta.
VUELTA 8: Tejemos 15 p.b. y 1 disminución de 2 p.b. juntos. Haremos 4 menguados por vuelta. en total 70 p.b.
VUELTA 9: Tejemos 1 p.b. en cada p.b. de la vuelta anterior. Sin disminuciones. En total 70 p.b.
VUELTA 10: Tejemos 15 p.b. y 1 disminución de 2 p.b. juntos. Haremos 4 menguados por vuelta. en total 66 p.b.
VUELTAS 11 a 25 : Tejemos 1 p.b. en cada p.b. de la vuelta anterior. Sin disminuciones. En total 66 p.b.
ROW 2 to 7: Work in the round sc in each row.
ROW 8: 15 sc and 1 decrease (two stitches together). 4 decreases. 70 sc in total.
ROW 9: 1 sc in each sc of the previous row. 70 sc in total.
ROW 10: 15 sc and 1 decrease (2 stitches together). 4 decreases. 66 sc in total.
ROW 11 to 25 : 1 sc in each sc of the previous row. 66 sc in total.
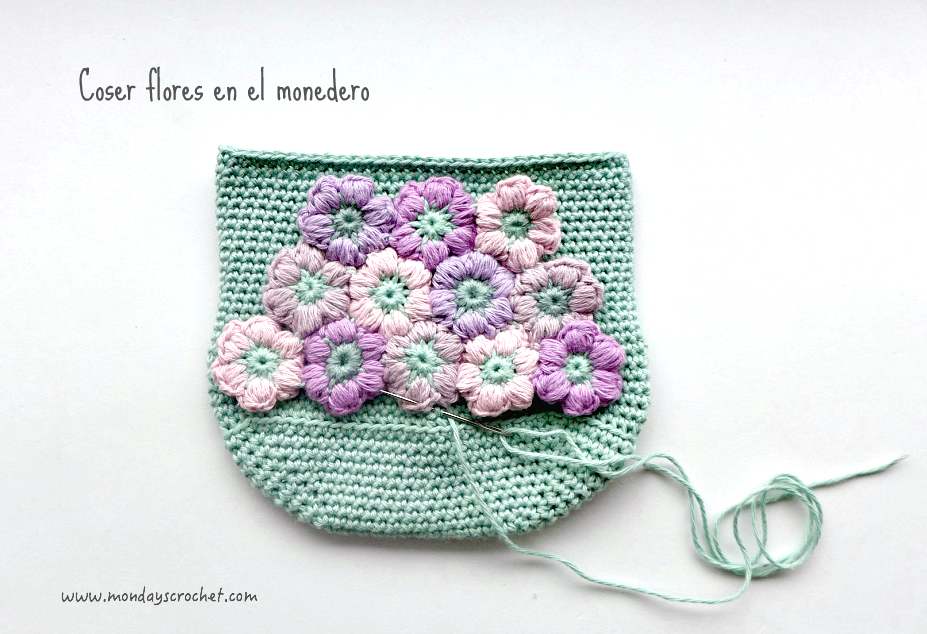
UNIÓN DE FLORES PUFF A MONEDERO / JOIN THE FLOWERS TO THE PURSE
Elegimos uno de los dos lados mayores del monedero y cosemos con una aguja lanera mediante pequeñas puntadas los extremos de las flores al monedero.
Chose one of the two largest purse sides and sew with a wool needle using a small stitch to the ends of the flowers to attach to the purse.
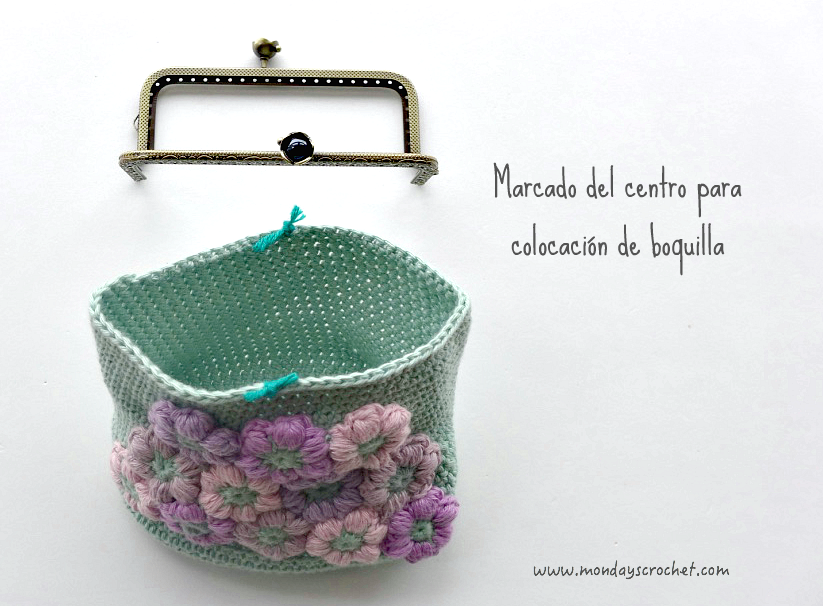
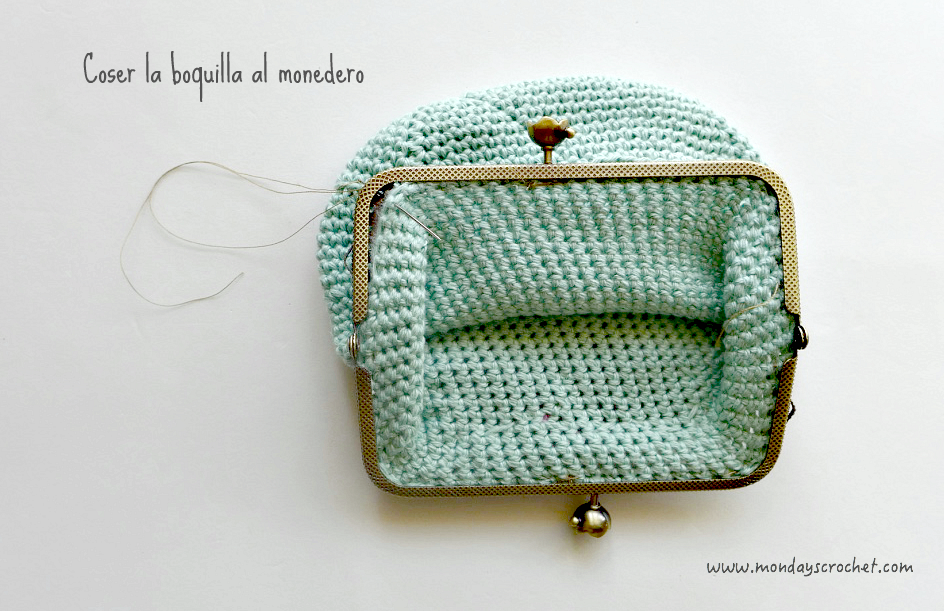
COLOCACIÓN DE LA BOQUILLA EN EL MONEDERO / PLACING THE MOUTHPIECE TO THE PURSE
Para colocar adecuadamente la boquilla debemos marcar los puntos centrales de los lados mayores del monedero con unos marcadores y coserlos con un hilo auxiliar a la boquilla.
To properly attach the mouthpiece, mark the centre points of the sides of purse with a few markers and sew them with a thread to the mouthpiece.
A partir del centro, cosemos el monedero a la boquilla hacia los lados.
From the centre, sew the purse to the mouthpiece towards the sides.
Hemos terminado el monedero para el Día de la Madre de este año. Esperamos que les guste a vuestras mamás tanto como a nosotras tejerlo.
The purse is finished. We hope your mothers like it as much as we enjoyed making it.
Fuente: este post proviene de este blog, donde puedes consultar el contenido original.
¿Vulnera este post tus derechos? Pincha aquí.
Creado: