This simple pamela hat called “Pipa” named after a sweet bunny that you will see in this post, you will be the envy of the pool or the beach. Practice single crochet.
GRADO DE DIFICULTAD
Medio
MATERIALES
2 ovillos de algodón de 50 gr. color blanco
1 ovillo de algodón de 50 gr. color verde para el cordón
Aguja número 3,5
PUNTOS DE CROCHET UTILIZADOS
Anillo mágico
Punto corredizo (p.c.)
Punto bajo (p.b.)
DIFICULTY
Medium
MATERIALS
2 balls of 50 gr. white cotton
1 ball of 50 gr. green cotton
Hook number 3,5
STITCHES USED
Magic circle
Slip Stitch (sl st)
single crochet (sc)
TUTORIAL PARA UNA PAMELA DE DIÁMETRO 56 cm / 56 cm DIAMETER PAMELA SUN TUTORIAL
Hemos dividido la pamela en 3 partes: en la primera parte se aumentan 6 p.b. por vuelta, en la segunda no se aumentan p.b. y en la tercera se aumentan 10 puntos en vueltas alternas.
We have divided the pamela hat in 3 parts: in the first part we have to increase 6 sc per row, in the second, we don not have to increase sc and in the third, 10 stitches are increased in alternate rows.

PARTE SUPERIOR DE LA PAMELA
La pamela se teje desde arriba hacía abajo. Es decir, vamos a ir aumentando puntos en cada vuelta.
VUELTA INICIAL: Anillo mágico.
VUELTA 1: Tejer en el anillo mágico 1 c.a.d de subida 5 p.b. y cerrar con 1 p.c. Tenemos 6 p.b.
VUELTA 2: Tejer 1 c.a.d. de subida y 1 p.b. en el primer p.b. de la vuelta anterior y continuar con 2 p.b. juntos hasta terminar la vuelta con 1 p.c. Tenemos 12 p.b.

VUELTA 3: Tejer 1 c.a.d. de subida y 1 p.b. en el primer p.b. de la vuelta anterior y continuar con 2 p.a. juntos y 1 p.b. hasta terminar la vuelta con 1 p.c. Tenemos 18 p.b.
VUELTA 4: Tejer 1 c.a.d. de subida y 1 p.b. en el primer p.b. de la vuelta anterior y continuar con 2 p.a. juntos y 2 p.b. hasta terminar la vuelta con 1 p.c. Tenemos 24 p.b.
VUELTA 5: Tejer 1 c.a.d. de subida y 1 p.b. en el primer p.b. de la vuelta anterior y continuar con 2 p.a. juntos y 3 p.b. hasta terminar la vuelta con 1 p.c. Tenemos 30 p.b.
Continuar de la misma forma; tejiendo 2 p.b. juntos en los p.b. dobles de la vuelta anterior hasta tejer la vuelta 17.
VUELTA 17: Tejer 1 c.a.d. de subida y 1 p.b. en el primer p.b. de la vuelta anterior y continuar con 2 p.a. juntos y 15 p.b. hasta terminar la vuelta con 1 p.c. Tenemos 102 p.b.
VUELTAS 18 a 40: Tejer en redondo 1 p.b. en cada p.b. sin aumentar subiendo 1 c.a.d. en cada vuelta o sin subir tejiendo en espiral.
TOP PART
The pamela hat is made from the top down. I.e., we will gradually increase stitches in every row.
STARTING ROW: Magic ring
ROW 1: In the magic ring make 1 ch, 5 sc and finish off with 1 sl st. There should be 6 sc.
ROW 2: 1 ch, 1 sc in the first sc of the previous row, 2 sc together until the row is completed with 1 sl st. There should be 12 sc.
ROW 3: 1 ch to start the row, 1 sc in the sc of the previous row, 2 sc together and 1 sc until the row is completed with 1 sl st. There should be 18 sc.
ROW 4: 1 ch to start the row,1 sc in the sc of the previous row, 2 sc together and 2 sc until the row is completed with 1 sl st. There should be 24 sc.
ROW 5: 1 ch to start the row,1 sc in the sc of the previous row, 2 sc together and 3 sc until the row is completed with 1 sl st. There should be 30 sc.
Continue in the same way; making 2 p.b. together in the double sc of the previous row until the row 17.
ROW 17: Make 1 ch to start the row, 1 sc in the first sc of the previous row, 2 sc together, 15 sc, finish the row with a sl st. There should be 102 sc.
ROW 18 to 40: Work in circles 1 sc in each sc of the previous row working in spiral.

Para comenzar a tejer el ala de nuestra pamela ponemos un marcador.
VUELTA 41: Tejer 2 p.b. para comenzar la vuelta en el primer p.b. del ala y 1 p.b. en cada p.b. de la vuelta anterior. Aumentar un total de 10 puntos distribuidos equitativamente alrededor de toda la circunferencia. Tenemos 112 p.b.
VUELTA 42: Tejer 1 p.b. en cada p.b. de la vuelta anterior.
VUELTA 43 a 66: Tejer las vueltas siguientes como las vuelta 41 y 42. Es decir, aumentando 10 puntos en las vueltas impares y sin aumentar en las pares.
VUELTA 66: Tejer 1 p.b. en cada p.b. de la vuelta anterior hasta terminar con 1 p.c.
Rematar el hilo sobrante por la parte interior de la pamela para que no se vea.
PAMELA BRIM
Before starting the brim place a marker.
ROW 41: 2 sc together to start the row in the first sc of the brim, 1 sc in each sc of the previous row. Increase to a total of 10 stitches distributed evenly around the entire circumference. There should be 112 sc.
ROW 42: 1 sc in each sc of the previous row.
ROW 43 to 66: Work as in rows 41 and 42. That means increasing 10 stitches in the odd rows without increasing the even rows.
ROW 66: 1 sc in each sc of the previous row, finish off with 1 sl st.
Finish off the excess thread from the inside of the Pamela hat.
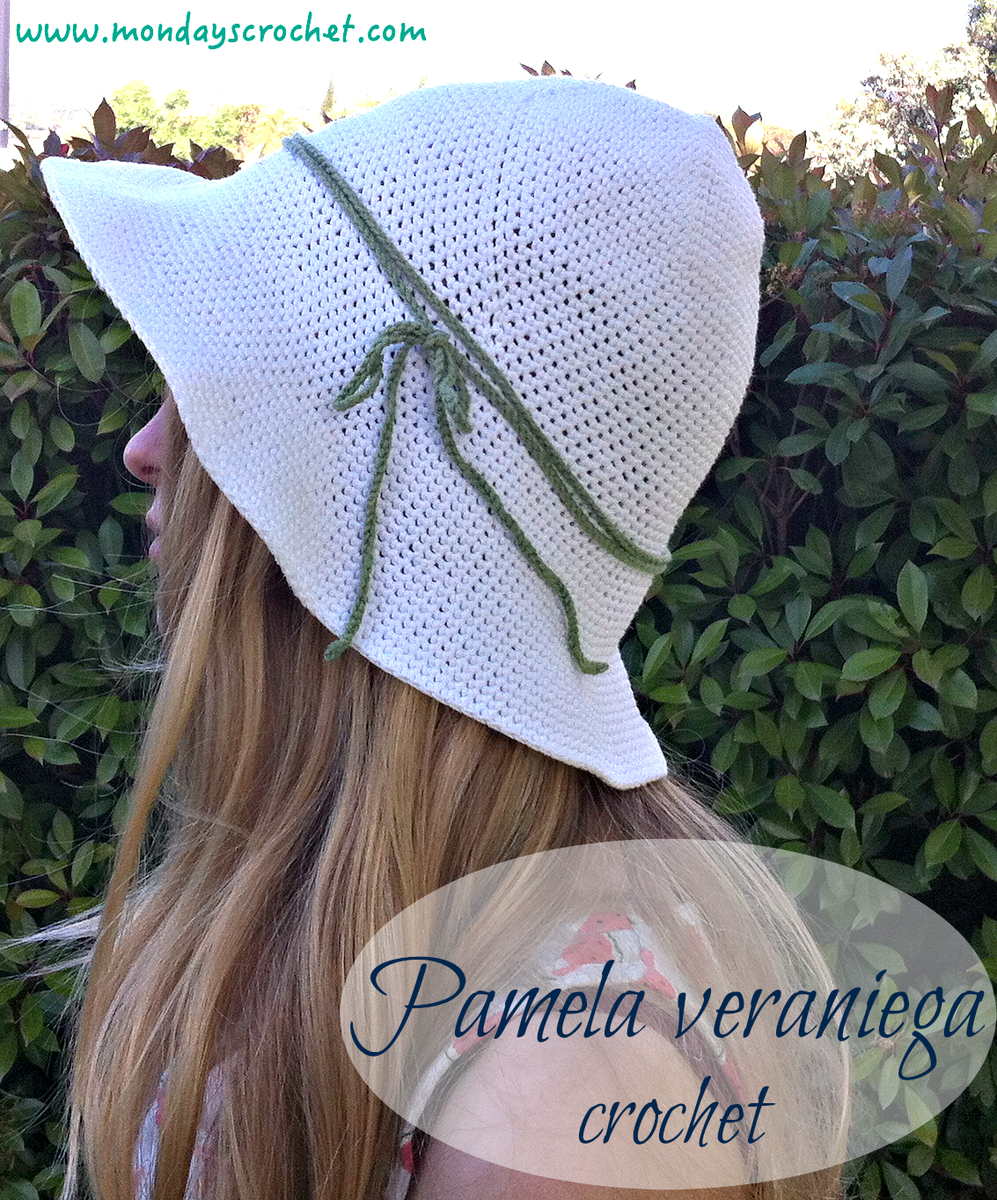
CORDÓN ALREDEDOR DE LA PAMELA
El cordón de color verde que rodea la pamela está tejido en una cadeneta base de 170 cm y una vuelta de p.c. Enrollar el cordón 2 veces alrededor de la pamela, hacer una lazada y fijar, si se desea con hilo blanco.
¡A protegernos del sol con nuestra pamela tejida a crochet!
No te olvidaremos Pipa.
AROUND THE PAMELA LACE
The green lace around the Pamela hat is made on a base of 170 cm ch and a row of sl st. Wind the lace 2 times around the pamela, make a loop and fix if desired with a white thread.
Protect yourself from the sun with our crocheted pamela hat.
We won’t forget you Pipa.
Fuente: este post proviene de este blog, donde puedes consultar el contenido original.
¿Vulnera este post tus derechos? Pincha aquí.
Creado: