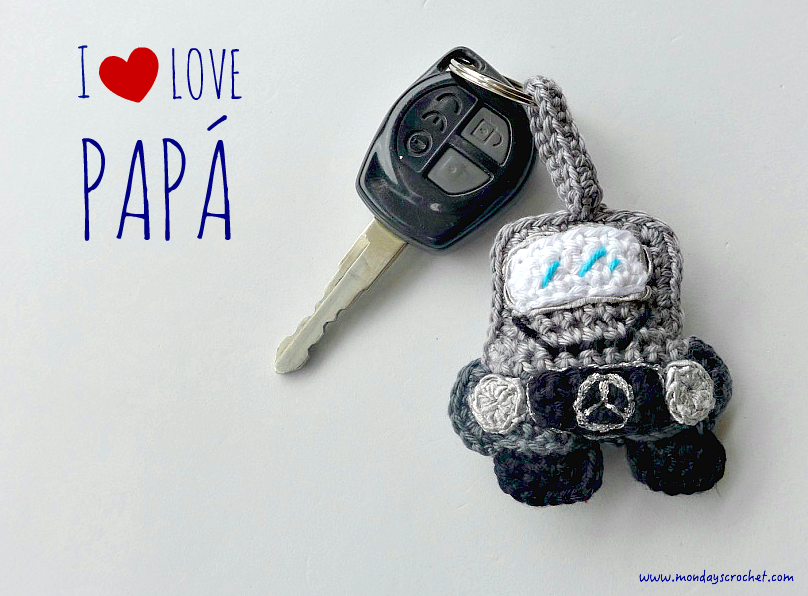
One of the objects regularly used by Dad is the car. We thought that this nice keyring would be an original present for this special celebration.
TUTORIAL DE LLAVERO DE CROCHET EN FORMA DE COCHE / CROCHET KEYRING PATTERN
GRADO DE DIFICULTAD
Bajo
MATERIALES
Hilo de algodón color gris oscuro para tejer con aguja número 3
Hilo de algodón color gris claro para tejer con aguja número 3
Hilo de algodón color blanco para tejer con aguja número 3
Hilo de algodón color negro para tejer con aguja número 3
Hilo de algodón color azul para tejer con aguja número 3
Hilo de algodón color plateado para tejer con aguja número 3
Hilo de viscosa y poliéster color plateado para tejer con aguja número 1,5
Agujas utilizadas números 2 y 3
Aguja lanera
Relleno de fieltro
Tijeras
PUNTOS DE CROCHET UTILIZADOS
Cadeneta (c.a.d.)
Anillo mágico
Punto corredizo (p.c.)
Punto bajo (p.b.)
Punto bajo en la lazada trasera
DIFFICULTY
Easy
MATERIALS
Dark grey cotton to work with hook nº 3
Light grey cotton to work with hook nº 3
White cotton to work with hook nº 3
Black cotton to work with hook nº 3
Blue cotton to work with hook nº 3
Silver cotton to work with hook nº 3
Silver viscose and polyester thread to work with hook nº 1,5
Used hooks 2 and 3
Wool needle
Filling
Scissors
CROCHET STITCHES
Chain (ch)
Magic ring
Slip stitch (sl st)
Single crochet (sc)
Back loop single crochet

PARTE DELANTERA Y TRASERA DEL COCHE / FRONT AND BACK OF THE CAR
Las partes delantera y trasera del coche son iguales. Sólo el frontal en la parte delantera y los adornos las diferencian.
Front and back are the same. The only differences is the ornamentation.


Con color gris oscuro y aguja número 3.
VUELTA INICIAL: 10 c.a.d.
VUELTA 1 Derecho: Tejer 1 c.a.d. de subida y 1 p.b. en la primera c.a.d. de la vuelta inicial. Continuar con 1 p.b. en cada c.a.d. En total 10 p.b.
VUELTA 2 Revés: Tejer 1 c.a.d. de subida y 1 p.b. en el primer p.b. de la vuelta anterior. Continuar con un aumento de 2 p.b. juntos, 6 p.b. en los siguientes p.b., aumento de 2 p.b. juntos, 1 p.b. En total 12 p.b.
VUELTA 3 Derecho: Tejer 1 c.a.d. de subida y 1 p.b. en el primer p.b. de la vuelta anterior. Continuar con un aumento de 2 p.b. juntos, 8 p.b. en los siguientes p.b., aumento de 2 p.b. juntos, 1 p.b. En total 14 p.b.
VUELTA 4 Revés: Tejer 1 c.a.d. de subida, 11 p.b. en los siguientes p.b. y una disminución de 2 p.b. tejidos juntos. En total 12 p.b.
Con la aguja lanera rematar y cortar con las tijeras el hilo sobrante.
With dark grey and hook nº 3.
FOUNDATION ROW: 10 ch.
ROW 1 Right side: 1 ch to start the row and 1sc in the first ch of the initial row. 1 sc in each ch. 10 sc in total.
ROW 2 Wrong side: 1 ch and 1 sc in the first sc p.b. of the previous row. 1 increase of 2 stitches together, 6 sc, 1 increase of 2 stitches together, 1 sc. 12 sc in total.
ROW 3 Right side: 1 ch and 1 sc in the first sc of the previous row. 1 increase of 2 stitches together, 8 sc, 1 increase of 2 sc together, 1 sc. 14 sc in total.
ROW 4 Wrong side: 1 ch, 11 sc and 1 decrease of 2 sc together 12 sc in total.
Finish off and cut the remaining threads.

Con color gris claro y aguja número 3.
VUELTA 5 Derecho: Saltar 2 p.b. Tejer 1 c.a.d. de subida y 1 p.b. en el tercer p.b. de la vuelta anterior. Continuar con 6 p.b. en los siguientes p.b. En total 8 p.b.
VUELTA 6 Revés: Tejer 1 c.a.d. de subida y 1 p.b. en el primer p.b. de la vuelta anterior. Continuar con 5 p.b. en los siguientes p.b. y terminar con una disminución de 2 p.b. tejidos juntos. En total 7 p.b.
VUELTAS 7, 9 y 11 Derecho: Tejer 1 c.a.d. de subida y 1 p.b. en el primer p.b. de la vuelta anterior. Continuar con 6 p.b. en los siguientes p.b. En total 7 p.b.
VUELTAS 8 y 10 Revés: Tejer 1 c.a.d. de subida y 1 p.b. en el primer p.b. de la vuelta anterior. Continuar con 6 p.b. en los siguientes p.b. En total 7 p.b.
Con la aguja lanera rematar y cortar con las tijeras el hilo sobrante.
With light grey and hook nº 3
ROW 5 right side: Skip 2 sc. 1 ch and 1 sc in the third sc of the previous row. 6 sc . 8 sc in total.
ROW 6 wrong side: 1 ch and 1 sc in the first sc of the previous row. 5 sc and finish with a decrease of 2 stitches together. 7 sc in total.
ROWS 7, 9 and 11 right side: 1 ch and 1 sc in the first stitch of the previous row. 6 sc. 7 sc in total.
ROWS 8 and 10 wrong side: 1 ch and 1 sc in the first stitch of the previous row. 6 sc. 7 sc in total.
Finish off and cut the remaining threads.
CRISTALES DELANTERO Y TRASERO / FRONT AND REAR WINDOWS
Con color blanco y aguja número 3.
VUELTA INICIAL: Tejer 6 c.a.d.
VUELTAS 1 y 3 Derecho: Tejer 1 c.a.d. de subida y 1 p.b. en la primera c.a.d. de la vuelta inicial. Continuar con 1 p.b. en cada c.a.d. En total 6 p.b.
VUELTA 2 Revés: Tejer 1 c.a.d. de subida y 1 p.b. en el primer p.b. de la vuelta anterior. Continuar con 1 p.b. en cada p.b. En total 6 p.b.
Con la aguja lanera rematar y cortar con las tijeras el hilo sobrante.
With white and hook nº 3
FOUNDATION ROW: 6 ch.
ROW 1 and 3 right side: 1 ch and 1 sc in the first ch of the initial row. 1 sc in each stitch. 6 sc in total.
VUELTA 2 wrong side: 1 ch and 1 sc in the first sc of the previous row. 1 sc in each stitch .6 sc in total.
Finish off and cut the remaining threads.
FRONTAL DELANTERO / FRONT OF THE BONNET
Con color negro y aguja número 3.
VUELTA INICIAL: Tejer 6 c.a.d.
VUELTAS 1 y 3 Derecho: Tejer 1 c.a.d. de subida y 1 p.b. en la primera c.a.d. de la vuelta inicial. Continuar con 1 p.b. en cada c.a.d. En total 6 p.b.
VUELTA 2 Revés: Tejer 1 c.a.d. de subida y 1 p.b. en el primer p.b. de la vuelta anterior. Continuar con 1 p.b. en cada p.b. En total 6 p.b.
Con la aguja lanera rematar y cortar con las tijeras el hilo sobrante.
With black and hook number 3.
FOUNDATION ROW: Tejer 6 c.a.d.
ROWS 1 and 3 Right side: 1 ch and 1 sc in the first stitch of the previous row. 1 sc in each stitch. 6 sc in total.
ROW 2 Wrong side: 1 ch and 1 sc in the first sc of the previous row. 1 sc in each stitch. 6 sc in total.
Finish off and cut the remaining threads.
FAROS DELANTEROS Y TRASEROS / HEADLIGHTS
Tejer 2 faros delanteros y 2 faros traseros. En total 4 faros.
Make 4 headlights.

Con color gris plateado y aguja número 2.
VUELTA INICIAL: Anillo mágico.
VUELTA 1: Tejer 1 c.a.d y 8 p.b. dentro del anillo mágico. Cerrar con 1 p.c.
Con la aguja lanera rematar y cortar con las tijeras el hilo sobrante.
With silver and hook nº 2.
FOUNDATION ROW: Magic ring.
ROW 1: 1 ch and y 8 sc in the magic ring. Finish off with 1 sl st.
Finish off and cut the remaining threads.
RUEDAS DELANTERAS Y TRASERAS / FRONT AND REAR TYRES
Tejer 2 faros delanteros y 2 faros traseros. En total 4 faros.
Con color negro y aguja número 2. Tejemos la rueda derecha de la parte delantera.
VUELTAS 1 Derecho: Insertar la aguja en el punto indicado en el diagrama y tejer 1 c.a.d. de subida y 1 p.b. en la lazada trasera de la c.a.d. de inicio de la parte delantera del coche.
VUELTAS 2 Revés: Tejer 1 c.a.d. de subida y 1 p.b. en el primer p.b. Continuar con 3 p.b. en cada p.b. de la vuelta anterior. En total 4 p.b.
Tejer de igual forma las 3 ruedas restantes.
Con la aguja lanera rematar y cortar con las tijeras el hilo sobrante.
Make 4 types
With black and hook nº 2.
ROW 1 Right side: Insert the hook in the indicated stitch in the diagram. 1 ch and 1 sc in the back loop of the initial ch in the front of the car.
ROW 2 wrong side: 1 ch and 1 sc in the first sc. 3 sc in each sc of the previous row. 4 sc in total.
Make 3 more tyres.
Finish off and cut the remaining threads.
ADORNOS DELANTEROS Y TRASEROS / FRONT AND REAR ADORNMENTS
En el delantero coser con puntadas largas y color plateado los adornos alrededor del cristal y del anagrama de la marca. Con color azul los reflejos del cristal y con color negro el portón del capó.
En el trasero coser con puntadas largas y color plateado los adornos alrededor del cristal. Con color azul los reflejos del cristal y con color negro el portón del maletero y el tirador.
UNIR DELANTERO Y TRASERO / JOIN RIGHT AND WRONG SIDE
Encarar ambas partes por el revés del coche y tejemos con p.b. alrededor de las ruedas. Con la aguja lanera rematamos y cortamos el hilo sobrante. Seguimos con la separación entre las ruedas y rematamos. Respetando siempre los colores vamos uniendo el resto de las partes del coche.
Antes de cerrar rellenamos con fieltro el interior.
Face both sides on the wrong side of the car, work with sc around the tyres. Finish off and cut the excess thread. Continue with the separation between the tyres and finish off. Respecting the colors, join the rest of the parts of the car.
Before sew up put the filling inside
CINTA PARA COLGAR EL LLAVERO / STRING TO HANG THE KEYRING
Para colgar el coche a las llaves hemos insertado el ganchillo en el punto central de la parte superior delantera del coche y hemos tejido una c.a.d. de 16 puntos. A continuación tejemos una vuelta de 16 p.b. y 1 p.c. al comienzo de la c.a.d. para unir la cinta al coche.
Rematamos uniendo los extremos de la cinta al coche y cortamos el hilo sobrante.
Así queda la parte delantera del coche.
To hang the car keys we have to insert the hook in the central part of the top part of the car. Make 16 ch and return with 16 sc and finish with a sl st to join the string to the car.
Finish off joining the ends of the string, cut the excess thread.
Picture of the front:

Y así la parte trasera.
Picture of the back:

Tenemos muchas ganas de ver la expresión de papá cuando le regalemos este llavero con su coche en crochet.
¡Feliz día del padre!
We really want to see the expression of Dad when we give him this keyring of a crochet car.
Happy Fathers day!
Fuente: este post proviene de este blog, donde puedes consultar el contenido original.
¿Vulnera este post tus derechos? Pincha aquí.
Creado: