The end of school is coming and we want to create a special cover for a special teacher. You can choose whatever colorful colors-tailored just for them.
TUTORIAL PARA UNA FUNDA DE CUADERNO CON MANDALA / COVER FOR A NOTEBOOK TUTORIAL
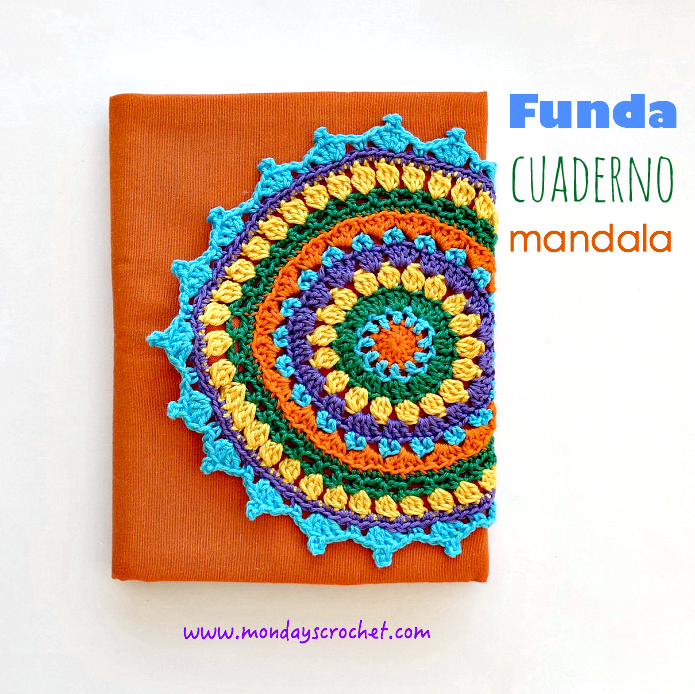
En primer lugar tejemos un mandala de 9,5 cm y los colores que más nos gusten. A continuación confeccionamos una funda para un cuaderno pequeño de anchura 16,5 cm y altura 22,0 cm.
Make a mandala of 9,5 cm with the colors you prefer. Then make a cover for a notebook of 16.5 cm width and 22.0 cm height.

MANDALA MULTICOLOR / MULTICOLOR MANDALA
GRADO DE DIFICULTAD
Medio
MATERIALES
Hilo de algodón de 5 colores para tejer con aguja número 3
Aguja utilizada número 2,5
Aguja lanera
Fieltro color lila de 34,5 cm x 21 cm
Tela de loneta naranja de 27 cm x 55 cm
Hilo para coser de color naranja
Aguja para coser
Imán, automático o botón
Tijeras
PUNTOS DE CROCHET UTILIZADOS
Anillo mágico
Cadeneta (c.a.d.)
Punto corredizo (p.c.)
Punto bajo (p.b.)
Punto bajo tejido por la lazada trasera
Punto medio (p.m.)
Punto alto (p.a.)
Punto alto doble (p.a.d.)
Concha de 3 puntos altos (concha 3 p.a.)
Concha de 4 puntos altos (concha 4 p.a.)
Concha de 1 puntos alto doble, 1 punto alto, 1 punto medio y 1 punto bajo (concha 1 p.a.d. 1 p.a. 1 p.m. 1 p.b.)
Piña de 3 puntos altos (piña 3 p.a.)
Piquillo de 3 cadenetas y punto corredizo doble (piquillo 3 c.a.d. y p.c. doble)
Concha de 4 puntos altos y piquillo (concha 4 p.a. y piquillo)

DIFFICULTY
Medium
MATERIALS
Cotton of 5 colors for hook number 3
Hook used number 2,5
Lilac felt 34,5 cm x 21 cm
Orange cotton canvas 27 cm x 55 cm
Wool needle
Sewing cotton orange
Sewing needle
Magnet, snap or button
Scissors
STITCHES USED
Magic ring
Chain (ch)
Slip stitch (sl st)
Single crochet (sc)
Single crochet back loop only (sc back loop)
Single crochet (sc)
Single crochet back loop only (sc back loop)
Half double crochet (hdc)
Double crochet (dc)
Treble crochet (tr)
Shell 3 double crochet (Shell 3 dc)
Shell 4 double crochet (Shell 4 dc)
Shell 1treble, 1 double crochet, 1 half double crochet and 1 single crochet (Shell 1 tb, 1 dc, 1 hdc, 1 sc)
Bobble stitch (Bobble 3 dc)
Picot of 3 ch and double slip stitch (picot 3 ch and double sl st)
Shell 4 double crochet and picot (Shell dc and picot)

Con color naranja.
VUELTA INICIAL: Anillo mágico.
VUELTA 1: Tejemos 3 c.a.d. de subida que cuentan como 1 p.a. y 11 p.a. En total 12 p.a. Cerramos con 1 p.c.
Con una aguja lanera rematamos y cortamos con tijeras el hilo sobrante.
En cualquier punto del círculo con color azul celeste.
VUELTA 2: Tejemos 3 c.a.d. de subida que cuentan como 1 p.a. y 1 c.a.d. de separación, 1 p.a. 1 c.a.d. de separación. En total 12 p.a. y 12 c.a.d. de separación. Cerramos con 1 p.c.
Con una aguja lanera rematamos y cortamos con tijeras el hilo sobrante.
En cualquier punto del círculo con color verde oscuro.
VUELTA 3: Tejemos 3 c.a.d. de subida que cuentan como 1 p.a. y 1 p.a. en el mismo p.a. de la vuelta anterior. Concha de 3 p.a. en el siguiente p.a. En total 12 conchas de 3 p.a. Terminamos con 1 p.a. y cerramos con 1 p.c.
Con una aguja lanera rematamos y cortamos con tijeras el hilo sobrante.
En cualquier punto del círculo con color amarillo.
VUELTA 4: Tejemos 3 c.a.d. de subida que cuentan como 1 p.a. y 2 p.a. juntos para formar la primera piña de 3 p.a. en 1 p.a. de la vuelta anterior. A continuación 1 c.a.d. de cierre de la piña y 1 c.a.d. de separación. Saltamos 1 p.a. de la vuelta anterior y tejemos la siguiente piña de 3 p.a. 1 c.a.d. de cierre y 1 c.a.d. de separación. En total 18 piñas de 3 p.a. Cerramos con 1 p.c.
Con una aguja lanera rematamos y cortamos con tijeras el hilo sobrante.

FOUNDATION ROW: Magic ring.
ROW 1: 3 ch to start the row that count as 1 dc and 11 dc. 12 dc in total. Finish off with 1 sl st.
Fasten off with wool needle and cut the remaining threads.
Use any stitch of the previous circle to start with light blue.
ROW 2: 3 ch to start the row that count as 1 dc y 1 ch, 1 dc, 1 ch. 12 dc in total and 12 ch. Finish off with 1 sl st.
Fasten off with wool needle and cut the remaining threads.
Use any stitch of the previous circle to start with dark green.
ROW 3: 3 ch to start the row that count as 1 dc and 1 dc in the same dc of the previous row. Shell 3 dc in the next dc. 12 shells 3 dc. Finish with 1 dc and finish off with 1 sl st.
Fasten off with wool needle and cut the remaining threads.
Use any stitch of the previous circle to start with yellow.
ROW 4: 3 ch to start the row that count as 1 dc and 2 dc together to form the first bobble 3 dc in 1dc of the previous row. After 1 ch to close the bobble and 1 ch. Skip 1 dc of the previous row and make the next bobble 3 dc, 1 ch to close and 1 ch. 18 bobble 3 dc. Finish off with 1 sl st.
Fasten off with wool needle and cut the remaining threads.
En cualquier punto del círculo con color morado.
VUELTA 5: Tejemos 3 c.a.d. de subida que cuentan como 1 p.a. y 1 p.a. en las c.a.d. de la vuelta anterior, concha de 3 p.a. en las siguientes c.a.d., concha de 4 p.a., concha de 3 p.a. En total 9 conchas de 4 p.a. y 9 conchas de 3 p.a. Alternando 4 p.a. y 3 p.a. Terminamos con 2 p.a. y cerramos con 1 p.c
Con una aguja lanera rematamos y cortamos con tijeras el hilo sobrante.
En cualquier punto del círculo con color azul celeste.
VUELTA 6: Tejemos 3 c.a.d. de subida que cuentan como 1 p.a., 1 p.b. en el siguiente p.a. de la vuelta anterior, 2 c.a.d. de separación. Saltamos 1 p.a. y repetimos 1 p.a., 1 p.b., 2 c.a.d. de separación. En total 21 p.a. p.b. c.a.d. de separación. Cerramos con 1 p.c.
Con una aguja lanera rematamos y cortamos con tijeras el hilo sobrante.
En cualquier punto del círculo con color naranja.
VUELTA 7: Tejemos 2 c.a.d. de subida que cuentan como 1 p.m. y 1 pb. en las c.a.d. de separación de la vuelta anterior, concha de 1 p.a.d. 1 p.a. 1 p.m. 1 p.b. en las siguiente c.a.d. En total 21 conchas. Terminamos con 1 p.a.d 1 p.a. y cerramos con 1 p.c.
Con una aguja lanera rematamos y cortamos con tijeras el hilo sobrante.
En cualquier punto del círculo con color verde oscuro.
VUELTA 8: Tejemos 1 c.a.d. de subida por la lazada trasera que cuentan como 1 p.b. y 1 pb. tejido por la lazada trasera en todos los puntos de la vuelta anterior. En total 84 p.b. Cerramos con 1 p.c.
VUELTA 9: Tejemos 2 c.a.d. de subida que cuentan como 1 p.m. y 2 c.a.d. de separación, saltamos 1 punto y continuamos con 1 p.m. 2 c.a.d. de separación. En total 42 p.m. y c.a.d. de separación. Cerramos con 1 p.c.
Con una aguja lanera rematamos y cortamos con tijeras el hilo sobrante.

ROW 5: 3 ch to start the row that count as 1 dc and 1 dc in the chs of the previous row, Shell 3 dc in the next ch, shell de 4 dc, shell 3 dc. 9 shells 4 dc and 9 shells 3 dc in total. Alternating 4 dc and 3 dc. Finish off with 2 dc and fasten off with 1 sl st.
Fasten off with wool needle and cut the remaining threads.
Use any stitch of the previous circle to start with light blue.
ROW 6: 3 ch to start the row that count as 1 dc, 1 sc in the next dc of the previous row, 2 ch. Skip 1 dc and repeat 1 dc, 1 sc, 2 ch. 21 dc, sc, ch, c.a.d in total. Finish off with 1 sc.
Fasten off with wool needle and cut the remaining threads.
Use any stitch of the previous circle to start with orange.
ROW 7: 2 ch to start the row that count as 1 hdc and 1 sc in the chains of the previous row, shell of 1 tb, 1 dc, 1 hdc, 1 sc in the next ch. 21 shells in total. Finish off with 1 tb, 1 dc and finish off with sl st.
Fasten off with wool needle and cut the remaining threads.
Use any stitch of the previous circle to start with dark green.
ROW 8: 1 ch to start the row in back loop only that count as 1 sc and sc in the back loop only. 84 sc in total. Finish off with sl st.
ROW 9: 2 ch to start the row that count as 1 hdc and 2 ch, skip 1 stitch, 1 hdc, 2 ch. In total 42 hdc and chs of separation. Finish off with 1 sl st.
En cualquier punto del círculo con color amarillo.
VUELTA 10: Tejemos 3 c.a.d. de subida que cuentan como 1 p.a. y 2 p.a. juntos para formar la primera piña de 3 p.a. en 1 p.m. de la vuelta anterior. A continuación 1 c.a.d. de cierre de la piña y 1 c.a.d. de separación. Tejemos piñas de 3 p.a. 1 c.a.d. de cierre y 1 c.a.d. de separación en todos los p.m. En total 42 piñas y c.a.d. de separación. Cerramos con 1 p.c.
Con una aguja lanera rematamos y cortamos con tijeras el hilo sobrante.
En cualquier punto del círculo con color morado.
VUELTA 11: Tejemos 1 c.a.d. de subida por la lazada trasera que cuentan como 1 p.b. y 1 pb. tejido por la lazada trasera en todos los puntos de la vuelta anterior. En total 126 p.b. Cerramos con 1 p.c.
Con una aguja lanera rematamos y cortamos con tijeras el hilo sobrante.
En cualquier punto del círculo con color azul celeste.
VUELTA 12: Tejemos 1 c.a.d. de subida que cuentan como 1 p.b. y 1 c.a.d. Saltamos 2 p.b. de la vuelta anterior tejemos una concha de 2 p.a. piquillo con p.c. doble 2 p.a. y 1 c.a.d. saltamos 2 p.b. de la vuelta anterior y tejemos 1 p.b. Repetir. En total 21 conchas de 1 c.a.d. 2 p.a. 1 piquillo con p.c.doble 2 p.a. 1 c.a.d y 1 p.b. Cerramos con 1 p.c.
A continuación podéis ver un vídeo de cómo hemos tejido el piquillo con punto corredizo doble.
Use any stitch of the previous circle to start with yellow.
ROW 10: 3 ch to start the row that count as 1 dc and 2 dc together to form the first bobble 3 dc in 1 hdc of the previous row. Next, 1 ch to fasten the bobble and 1 ch. Make bobbles of 3 dc, 1 ch to close and 1 ch of separation in every hdc de separación. 42 bobble stitches in total and 1 ch of separation. Finish off with 1 sl st.
Fasten off with wool needle and cut the remaining threads.
Use any stitch of the previous circle to start with lilac.
ROW 11: 1 ch to start the row in the back loop only that count as 1 sc and 1 sc in the back loop only in every stitch of the previous row. 126 sc in total. Finish off with 1 sl st.
Fasten off with wool needle and cut the remaining threads.
Use any stitch of the previous circle to start with light blue
ROW 12: 1 ch to start the row that count as 1 sc and 1 ch. Skip 2 sc of the previous row. Make a shell of 2 dc and picot with double sl st, 2 dc and 1 ch. Skip 2 sc of the previous row and make 1 sc. Repeat. In total, 21 shells of 1 ch, 2 dc, 1 picot with double sl st, 2 dc, 1 ch and 1 sl st. Finish off with 1 sl st.
In the video below you can see how to make a picot with double sl st.
CONFECCIÓN DE LA FUNDA / COVER MAKING
Nuestra funda es de tela de loneta naranja y el interior está forrada de fieltro color lila.
The cover is made of orange canvas and the inside cover with lilac felt.
FORRADO DE LA TELA CON FIELTRO / COVERING THE INTERIOR WITH FELT
Marcamos el centro de nuestras telas y las alineamos para que el fieltro quede centrado en la loneta.
Mark the centres and line up both materials.

Hacemos un dobladillo en la parte superior e inferior de 1 cm y lo prendemos con alfileres.
Make a 1 cm turn up at the top and bottom part and pin.

COLOCACIÓN DE ENTRE-TELA ADHESIVA / LOCATING THE ADHESIVE INTERLINING
Para reforzar la tela de loneta naranja en las zonas donde se colocará el imán que cerrará la funda del cuaderno, vamos a planchar unos trozos de entre-tela adhesiva de 3 cm de diámetro.
Planchamos los trozos de tela adhesiva a la loneta naranja; en la parte delantera del cuaderno para la parte hembra del imán y en una pieza para coser al mandala la parte macho del imán.
To strengthen the fabric of the orange canvas in the areas where the magnet will be placed, iron a few pieces of adhesive interlining of 3 cm of diameter.
Press, using the iron, the adhesive interlining to the canvas and place female magnet in the canvas and male on the small piece of fabric that you will sew in the mandala.

DOBLADILLOS LATERALES DE LA FUNDA / LATERAL TURN UPS OF THE COVER
Para rematar los extremos laterales de la funda que quedarán ocultos debajo de las solapas del cuaderno haremos un dobladillo de 1 cm a cada lado de la funda. Para ello, cosemos un pespunte con la máquina de coser.
In order to sew up the edges of the cover which will be hidden under the flaps of the notebook, make a hem of 1 cm on each side of the cover. For this, sew the backstitch with a sewing machine.


COLOCACIÓN DE IMÁN / MAGNET PLACEMENT
Antes de cerrar el interior de la funda debemos colocar la parte hembra del imán. Es decir, la parte macho del imán se coserá al mandala y la parte hembra en la tela de loneta naranja.
Before closing the cover inside, place the female part of the magnet. Which means – the male part of the magnet will be sewn to the mandala and the female part in orange canvas fabric.


Join the two fabrics by sewing top and bottom. Turn the cover inside out and sew a backstitch 1 cm from the edge.

A continuación cosemos las solapas que sujetarán la funda a las tapas del cuaderno.
Then, sew the lapels which will hold the liner to the covers of the notebook.


Hemos terminado la confección de la funda.
The cover is finished.
La otra parte del imán se inserta en tela de loneta naranja para no dañar el mandala.
Insert the other part of the magnet on the canvas to prevent damage to the mandala.


UNIÓN DE MANDALA A LA FUNDA / JOINING THE MANDALA TO THE COVER
Para coser el mandala a la funda unimos las dos partes del imán, prendemos con alfileres los bordes del mandala y lo cosemos a mano con pequeñas puntadas.
To sew the mandala to the cover, join the two parts of the magnet, pin the mandala into the cover and sew it by hand with small stitches.

Lista para disfrutar regalando un objeto diferente y muy original.
You are now ready to enjoy giving an original present.
Fuente: este post proviene de este blog, donde puedes consultar el contenido original.
¿Vulnera este post tus derechos? Pincha aquí.
Creado: