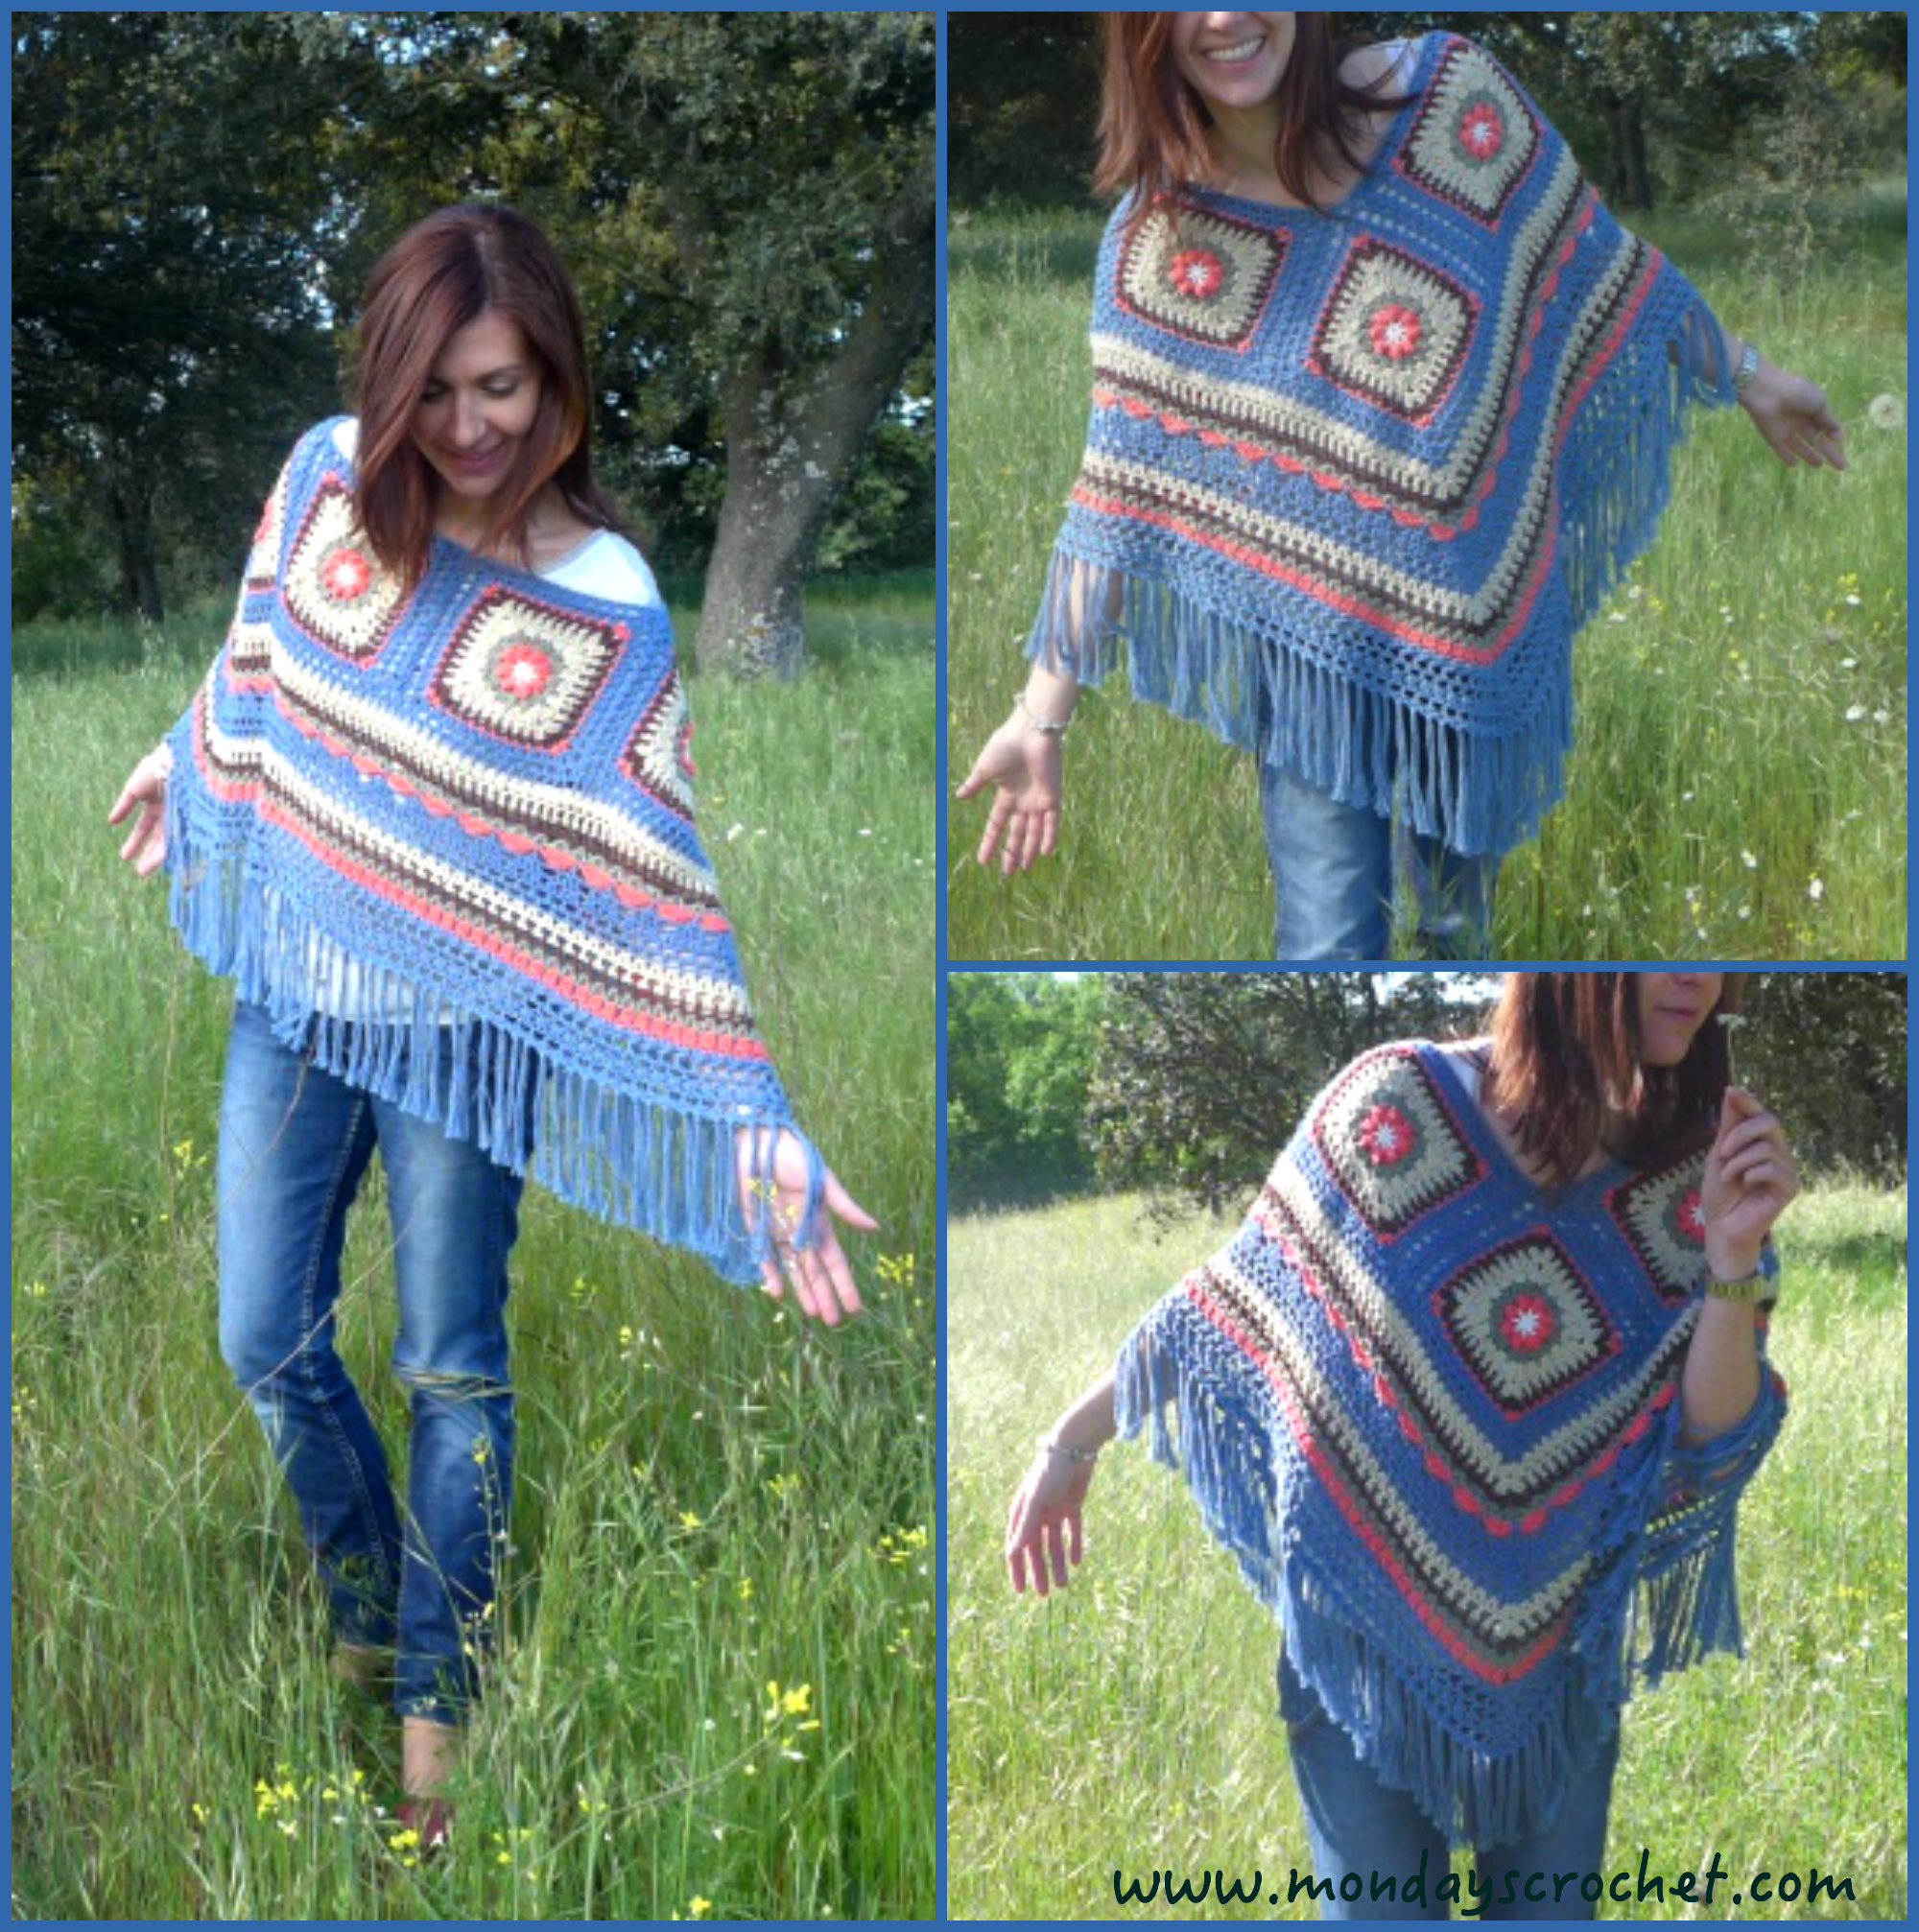
We were looking forward to crochet this poncho that allows us to play with different stitches and colours.
Os presentamos un modelo para las más avanzadas. Pero si sois atrevidas y siguiendo paso a paso los tutoriales, podéis hacerlo.
This is a project for advanced crocheters, but if you are daring, you can make it with these step by step tutorials.
Hemos dividido la entrada en dos partes; en la primera podéis seguir los diagramas para el granny square y en la segunda, después de unir los grannies, el poncho.
We have divided the post into two parts; in the first you can follow the diagrams for the granny squares, and in the second, after joining the grannies you can make the poncho.
GRADO DE DIFICULTAD
Avanzado
MATERIALES
3 ovillos de hilo de algodón azul y 1 del resto de colores
Aguja número 4 y número 6 en flecos
PUNTOS DE CROCHET UTILIZADOS
Cadeneta (c.a.d.)
Anillo mágico
Punto corredizo (p.c.)
punto medio (p.m)
Punto alto (p.a.)
Punto alto doble (p.a.d)
Piña o bodoque de 3 p.a. (bod.)
Concha de 6 p.a.
DIFICULTY
Advance
MATERIALS
3 balls of blue cotton and 1 ball of other colours
Hook number 3 and number 6 for tassels
STITCHES USED
Chain stitch (ch)
Magic circle
Slip Stitch (sl st)
Half double crochet (hdc)
Double crochet (dc)
Treble crochet (tb)
3 dc Pop corn (PC,pc)
6 dc shell
TUTORIAL PARA GRANNIES SQUARE / GRANNIES SQUARE TUTORIAL
Tejer 6 grannies square siguiendo el diagrama:
Crochet 6 grannies square as in the diagram:

A continuación vamos a explicar cada vuelta y cambio de color del granny square:
Below we will explain each row and when to change each colour of the granny squares:

En color marfil:
VUELTA INICIAL: Anillo mágico.
VUELTA 1: 3 c.a.d. de subida, 1 c.a.d., 1 p.a. Repetir hasta un total de 8 p.a. y 8 c.a.d. Cerrar el anillo mágico con 1 p.c.
In ivory:
STARTING ROW: Magic ring.
ROW 1: 3 ch to start, 1 ch, 1 dc. Repeat to a total of 8 dc and 8 ch. Close the magic ring with a sl st.

Cambio a color rosa salmón:
VUELTA 2: Tejer 3 c.a.d. de subida y 4 p.a. Sacar el ganchillo de la hebra, introducirlo entre las 3 c.a.d. iniciales y el 2 p.a. Coger la hebra y cerrar con 1 p.c. Hemos terminado 1 pétalo. Tejer 3 c.a.d. de separación entre pétalos. En la siguiente c.a.d. de la vuelta anterior, tejer 5 p.a. Sacar el ganchillo de la hebra, introducirlo entre el primer p.a y el

In salmon:
ROW 2: 3 ch to start, 4 dc. Pull out the hook from the loop, introduce it through the 3 initial ch and close with a sl st. We have one petal now. 3 ch between petals. In the next hole, 5 dc. Make 8 petals, 3 ch and finish off with sl st.


Cambio a color verde:
VUELTA 3: Tejer 3 c.a.d. de subida, 1 bod. de 2 p.a. y 2 c.a.d., en las c.a.d. de la vuelta anterior, tejer 1 bod. de 3 p.a., 2 c.a.d. y pasar a la siguiente c.a.d. de la vuelta anterior. En total 16 bod. de 3 p.a. separados por 2 c.a.d. cada uno. Cerrar con 1 p.c. a la c.a.d. de subida.
In green:
ROW 3: 3 ch, 1 PC pc of 2 dc and 2 ch, 1 PC pc of 3 pa, 2 ch, go to the ch of the previous row. 16 PC pc in total separated by 2 ch each. Finish off with a sl st.
Cambio a color arena:
VUELTA 4: Tejer 3 c.a.d. de subida y 1 p.a. juntos. En la siguiente c.a.d. de la vuelta anterior, tejer 3 p.m. juntos, en la siguiente 3 p.a. juntos. En las esquinas: 3 p.a.d. 2 c.a.d. y 3 p.a.d. En la siguiente 3 p.a. juntos, en el siguiente 3 p.m. juntos, en la siguiente 3 p.a. juntos. Repetir hasta terminar con 1 p.a. y 1 p.c.
In sand colour:
ROW 4: 3, ch an 1 dc together. In the next chain of the previous row, 3 hdc together and 3 hdc in the next one. In the corners: 3 tr, 2 ch, 3 tr. In the next one 3 dc together, in the next one 3 hdc together, in the final one 3 dc together. Repeat and finish with 1 dc and 1 sl st.

VUELTA 5: Tejer 3 c.a.d. de subida y 1 c.a.d., 1 p.a., 1 c.a.d. En las esquinas: 2 p.a. 2 c.a.d. 2 p.a. Repetir completando 7 p.a. con 1 c.a.d, para cada lado del granny. Cerrar con 1 p.c.
ROW 5: 3c to start the row, 1 ch, 1 dc, 1 ch. In the corners: 2 dc, 2 ch, 2 dc. Repeat completing 7 dc with 1 ch in each side of the granny. Fisnish off with 1 sl st.

VUELTA 6: Tejer 3 c.a.d de subida y 1 c.a.d, 1 p.a. y 1 c.a.d. En las esquinas: 2 p.a. 2 c.a.d. 2 p.a. Repetir completando 8 p.a. y 1 c.a.d. de separación, para cada lado del granny. Cerrar con 1 p.c.
In brown:
ROW 6: 3 chains to start the row, 1 ch, 1 dc, 1 ch. In the corners: 2 dc, 2 ch, 2 dc. Repeat completing 8 dc and 1 ch on each side of the granny. Finish off with 1 sl st.

Cambio a color rosa salmón:
VUELTA 7: Tejer 1 c.a.d de subida y 1 c.a.d, 1 p.b. y 1 c.a.d. En las esquinas: 2 p.b. 2 c.a.d. 2 p.b. Repetir completando 9 p.b. y 1 c.a.d de separación, para cada lado del granny. Cerrar con 1 p.c.
In salmon:
ROW 7: 3 ch to start the row, 1 ch, 1sc, 1 ch. In the corners: 2 sc, 2 ch, 2 sc. Repeat completing 9 sc and one chain on each side of the granny. Finish off with a sl st.

Cambio a color azul:
VUELTA 8: Tejer 3 c.a.d de subida y 1 p.a. juntos, formando una V. Tejer 2 p.a. juntos y repetir hasta la esquina: 2 p.a. 2 c.a.d. 2 p.a. Repetir 10 p.a. juntos hasta completar el lado del granny. Cerrar con 1 p.c.
In blue:
ROW 8: 3 ch to start the row and 1 dc together, creating a V. 2 dc together and repeat to the corner. 2 dc, 2 ch, 2 dc. Repeat 10 dc until you have completed that side of the grannie. Finish off with a sl st.

VUELTA 9: Tejer 2 p.c. para situarnos entre 2 V. Tejer 3 c.a.d. de subida y 1 c.a.d., 1 p.a. y 1 c.a.d. En las esquinas: 2 p.a. 2 c.a.d. 2 p.a. Repetir completando 11 p.a. separados por 1 c.a.d. para cada lado del granny. Cerrar con 1 p.c.
ROW 9: Make 2 sl st to go to the V, 3 ch, 1 ch, 1 dc, 1 ch. In the corners: 2 dc, 2 ch, 2 dc. Repeat completing 11 dc separated by 1 ch each side of the granny. Finish off with sl st.
UNIR GRANNIES / JOINING THE GRANNIES

Tenemos 6 grannies y vamos a unirlos utilizando p.a. Para ello ponemos un granny por el derecho y otro por el revés. Tejemos 3 c.a.d. en la esquina del granny del derecho y hacemos 1 p.c. en la esquina del granny del revés. Tejer 1 p.a. en el granny del derecho formando una V y 1 p.c. en el granny del revés. Continuar con 2 p.a. en el granny derecho y 1 p.c. en el granny del revés hasta terminar todo el lado del granny square.
We should now have 6 grannies and we are going to join them using dc. Join 2 grannies together by putting one granny ‘right’ side and the other grannie ‘reverse’ side. 3 ch in the corner of the granny of the ‘right’ and make 1 sl st in the corner of the granny of the ‘reverse’ side. Work 1 dc. in the granny of the ‘right’ forming a V and 1 sl st in the granny of the ‘reverse’ side. Continue with 2 dc in the ‘right’ granny and 1 sl st on the granny of the ‘reverse’ side until you have finished the whole side of the granny square.
TUTORIAL PONCHO
Una vez unidos los 6 grannies continuamos tejiendo el poncho.
Once the grannies are joined, continue making the poncho.

En color azul:
VUELTA 1: Tejer 3 c.a.d. de subida y 1 c.a.d., 1 p.a. y 1 c.a.d En las esquinas: 2 p.a. 2 c.a.d. 2 p.a. Cerrar con 1 p.c.
In Blue:
ROW 1: 3 ch to start the row and 1 ch. 1 dc, 1 ch. In the corners: 2 dc, 2 ch, 2 dc. Finish off with 1 sl st.
Cambio a color marfil:
VUELTA 2: Tejer 3 c.a.d. de subida, 2 p.a. juntos, bodoque o piña de 3 p.a. En las esquinas: Bodoque de 3 p.a. 2 c.a.d. bodoque de 3 p.a. Cerrar con 1 p.c.
VUELTA 3: Igual a la VUELTA 1.
In Ivory color:
ROW 2: 3 ch to start the row, 2 dc together, 3 dc PC pc. In the corner: 3 dc PC pc, 2 ch, 3 dc PC pc. Finish off with sl st. ROW 3: Same as row 1
Cambio a color marrón chocolate:
VUELTA 4: Igual a la VUELTA 1.
In Brown:
ROW 4: Same as ROW 1
Cambio a color verde:
VUELTA 5: Tejer 3 c.a.d. de subida, 2 c.a.d. 1 p.a. en el mismo sitio de las 3 c.a.d. de subida, saltando un punto de la vuelta anterior 1 p.a., 1 c.a.d., 1 p.a. en el mismo punto. se forman 2 V. En las esquinas: 2 p.a. 2 c.a.d. y 2 p.a. Cerrar con 1 p.c.
In Green:
ROW 5: 3 ch to start the row, 2 ch, 1 dc in the same space of the 3 ch. Skipping the dc of the previous row. 1 dc, 1ch, 1 dc in the same place (two ´V´). Corners: 2 dc, 2 ch, 2 dc. Finish off with 1 sl st.

Cambio a color rosa salmón:
VUELTA 6: Tejer 3 c.a.d. de subida y 5 p.a. en el centro de la V grande formada por 2 p.a. y 2 c.a.d. de la vuelta anterior, cogiendo la lazada trasera, 1 p.c. en la V pequeña formada por 2 p.a. y 1 c.a.d., concha de 6 p.a., 1 p.c. Repetir. en las esquinas: 6 p.a. 1 p.c. 6 p.a. Cerrar con 1 p.c. cogiendo a la vez la vuelta anterior y la c.a.d. de subida inicial.
In Salmon:
ROW 6: 3 ch to start the row, 5 dc in the centre of the big V of the previous row. Taking the back loop, 1 sl st in the small V. one 6 dc shell, 1 sl st. Repeat. Corners: 6 dc, 1 sl st, 6 dc. Finish off with 1 sl st.
Cambio a color azul:
VUELTA 7: Tejer 3 c.a.d. de subida desde la V de la VUELTA 5, 3 c.a.d., 1 p.c. en el centro de la concha de la vuelta anterior, cogiendo la lazada trasera, 3 c.a.d., 1 p.a. Repetir. En las esquinas: 1 p.a. 1 c.a.d. 1 p.a. Cerrar con 1 p.c.
VUELTA 8: Tejer 3 c.a.d. de subida, 2 p.a. en el mismo punto para formar una V, 1 p.a., 1 c.a.d., 1 p.a. 2 p.a. juntos, 1 p.a., 1 c.a.d. Repetir. En las esquinas: 1 p.a. 1 c.a.d. 1 p.a.
VUELTA 9: Tejer 3 c.a.d. de subida, 1 p.a. en la V de la vuelta anterior y una V de 2 p.a. juntos en el p.a. Repetir. En las esquinas: 1 p.a. 2 p.a. juntos y 1 p.a. Cerrar con 1 p.c.
VUELTA 10 Y 11: Igual a la VUELTA 1.
In Blue:
ROW 7: 3 ch to start the row from the V of ROW 5, 3 ch, 1 sl st in the centre of the shell of the previous row, taking the back loop, 3 ch, 1 dc. Repeat. Corners: 1 dc, 1 ch, 1 dc. Finish off with a sl st.
ROW 8: 3 ch to start the row, 2 dc together to form a V, 1 dc, 1 ch, 1 dc, , 2 dc together, 1 dc, 1 ch. Repeat. Corners: 1 dc, 1 ch, 1 dc.
ROW 9: 3 ch to start the row, 1 dc in V of the previous row , 1 V of 2 dc together in the dc. Repeat. Corners: 1 dc, 2 dc together, 1 dc. Finish off with sl st.
ROW 10 and 11: Same as ROW 1

Cambio a color marfil:
VUELTA 12: Tejer 3 c.a.d de subida y 1 p.a. en el mismo punto, V de 2 p.a. juntos separados por 1 c.a.d. Repetir. En las esquinas: 2 p.a. 1 c.a.d. 2 p.a. Cerrar con 1 p.c.
VUELTA 13: Igual a la VUELTA 1.
In Ivory:
ROW 12: 3 ch to start the row, 1 dc in the same stitch, 2 dc V separated by a ch. Repeat. Corners: 2 dc, 1 ch, 2 dc. Finish off with 1 sl st.
ROW 13 : Same as row 1
Cambio a color marrón chocolate:
VUELTA 14: Igual a la vuelta 1.
In Brown:
ROW 14: Same as row 1
Cambio a color verde:
VUELTA 15: Igual a la VUELTA 12.
In Green:
ROW 15: Same as row 12
Cambio de color a rosa salmón:
VUELTA 16: Igual a la vuelta 2.
In Salmon:
ROW 16: Same as row 2

Cambio a color azul:
VUELTA 17: Tejer 3 c.a.d. de subida, 1 p.c. 1 p.a. 1 p.c. Repetir. En las esquinas: 1 p.a. 2 p.b. 1 p.a. Cerrar con 1 p.c.
VUELTA 18: Dar la vuelta a la labor. Tejer 3 c.a.d. de subida, 1 p.c. en los p.a. de la vuelta anterior y 1 p.c. en los 1 p.a. En las esquinas: 1 p.a. 1 p.c. 2 p.b. 1 p.a. Cerrar con 1 p.c.
VUELTA 19: Dar la vuelta a la labor. Igual a la vuelta 1. En las esquina: 1 p.a. 2 p.a. juntos 1 p.a.
VUELTA 20: Igual a la VUELTA 1.
VUELTA 21: Tejer 3 c.a.d. de subida, 1 p.a. saltando un punto de la vuelta anterior, 1 p.a. en el punto saltado formando X. Repetir. En las esquinas: 1 p.a. de la X 1 p.a. 1 c.a.d. 1 p.a. 1 p.a. de la X. Cerrar con 1 p.c.
VUELTA 22: Igual a la VUELTA 17.
In Blue:
ROW 17: 3 ch to start the row, 1 sl st, 1 dc, 1 sl st. Repeat. Corners: 1 dc, 2 sc, 1 dc. Finish off with a sl st.
ROW 18: Turn the work. 3 ch to start the row. 1 sl st in the previous row dc´s, 1 sl st in the dc´s. Corners: 1 dc, 1 sl st, 2 sc, 1 dc. Finish off with 1 sl st.
ROW 19: Turn the work. Same as row 1. Corners, 1 dc, 2 dc together, 1 dc.
ROW 20: As row 1.
ROW 21: 3 ch to start the row, 1 dc, skip a stitch, 1 dc in the second, forming an X. Repeat. Corners: 1 dc from the X, 1 dc, 1 ch, 1 dc, 1 dc from the X. Finish off with a sl st.
ROW 22: Same as row 17.
REMATE DEL PONCHO CON FLECOS / FINISHING WITH TASSELS
Ahora solo queda poner unos flecos en la parte inferior del poncho. En el siguiente vídeo tutorial podéis ver este paso. Recordad que para hacer flecos hay que poner la prenda del revés.
Now we just need to put a few fringes at the bottom of the poncho. In the following video tutorial you can see this step. Remember that to make fringes you must put the poncho inside out.
REMATE DEL CUELLO CON PUNTO DE CANGREJO / FINISHING THE NECK
Hemos hecho un remate en el cuello con punto de cangrejo de punto bajo. Podéis ver un vídeo tutorial en nuestro canal de YouTube.
We have finished the pocho with a row with a crab stitch. You can watch a video tutorial in our YouTube channel.

Enviadnos fotos a nuestro correo con vuestros ponchos. Será un placer publicarlas.
Send us photos of your ponchos. We will be happy to publish them.
Fuente: este post proviene de este blog, donde puedes consultar el contenido original.
¿Vulnera este post tus derechos? Pincha aquí.
Creado: