¡Feliz 2016!..... y tutorial corona estrella

Querid@s lector@s, me gustaría aprovechar esta oportunidad para daros las gracias por estar ahí durante el 2015 aunque yo no haya tenido demasiado tiempo para vosotr@s. Espero seguir viendoos por aquí a lo largo de 2016.***

Dear readers, I would like to take this opportunity to thank you for being there during 2015 even though I havent had enough time for you. Hope to see all around here along 2016.


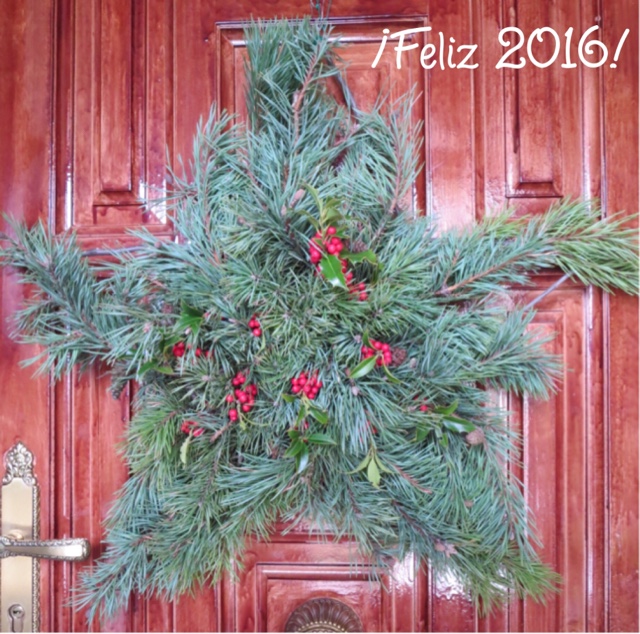
Espero que os haya gustado la corona de estrella que he hecho esta mañana especialmente para vosotr@s. A continuación os dejo el paso a paso que os he preparado por si os animáis a hacer una.***

I hope you liked the star wreath I have made this morning specially for all of you. Following you can find the step by step tutorial I have prepared in case you decide to make one.


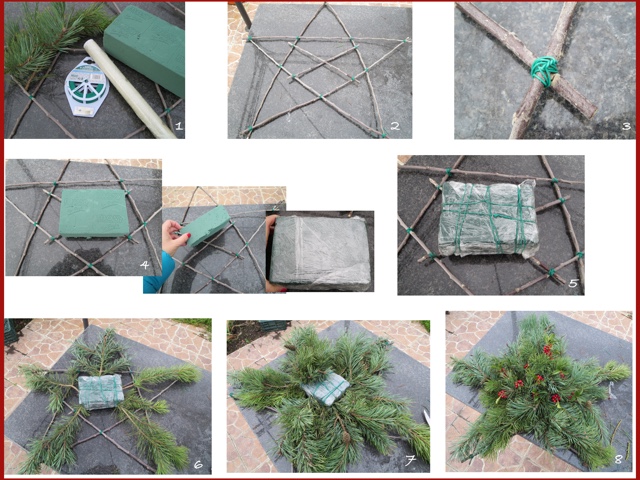
1. Necesitaréis ramas de árbol, esponja de floristería, alambre de floristería, film trasparente, ramas de pino y acebo o unas ramitas con bolitas o bolitas de Navidad, para adornar.
2. Montar la estrella y la cruz central sobre la que se enganchará la esponja.
3. Unir las ramas según la foto con el alambre de floristería.
4. Cortar la esponja de floristería a una medida que se adapte al tamaño de la estrella, empaparla en agua y forrar con el film transparente para que no pierda el agua.
5. Con el alambre de floristería sujetar las esponja a la estructura central en X de la estrella.
6. Empezar clavando las ramas de pino de los lados de los picos de la estrella y, poco a poco, ir rellenando por el lateral de la esponja dependiendo del tamaño de las ramas de pino para que no pierda la forma de estrella.
7. Cortar trozos pequeños de las ramas de pino y clavar por la parte superior de la esponja hasta cubrirla toda.
8. Una vez cubierta completamente y formada la estrella se puede decorar con ramitas de acebo, con bolitas de Navidad o con cualquier otra planta con bolitas que pueda clavarse en la esponja.
***
1. You will need tree branches, floral foam, air plant wire, cling film, pine branches and holly flower or any plant with decorative balls or flowers, or small Christmas tree balls.
2. Put together the star and the central cross which will hold the floral foam.
3. Join the branches as in the picture using an air plant wire.
4. Cut the floral foam to the right size for the star, drown it in water and cover it with the cling film so it doesnt drop any water.
5. Attach the floral foam to the stars cross with the air plant wire.
6. Now you can start punching the pine branches to the floral foam. Start with the long ones as shown in the picture. Make sure you dont loose the star shape.
7. Cut small pieces of the pine branches to cover the stop of the floral foam, until you totally cover it.
8. Once you have covered the floral foam keeping the star shape, you can start decoring the wreath with the holly, or whatever you have chosen for the decoration.
¡Feliz 2016!
***
Happy 2016!!!


Fuente: este post proviene de La Ardillita del Patch, donde puedes consultar el contenido original.
¿Vulnera este post tus derechos? Pincha aquí.
Creado:
¿Qué te ha parecido esta idea?

Esta idea proviene de:

Y estas son sus últimas ideas publicadas:

Una vez más se han acabado las vacaciones de verano y es hora de empezar con la rutina y pensar en nuevos proyectos (trabajo, patchwork, ...). Después de pensarlo mucho, este año decidimos visitar Irl ...

Etiquetas: Tutorial

Recomendamos

Relacionado

Are you ready to create cards for your friends? today I want to share the new set of digis that I create for this season, if you like them and want to get them you can always send me a message to my facebook page https://business.facebook.com/products/catalogs/845183106240464/products as they are digital material you may be able to get them all over the world and I use paypall to make it easy f ...

patterns granny squares Crochet ...

Hello dears! This colorful crochet blanket is for my daughter. I finally could finish it! And Im happy for the two reasons Im going to tell you now :o) ¡Hola a todas! Esta manta de ganchillo multicolor es para mi hija. ¡Por fin la he terminado! Y estoy feliz por los dos motivos que os voy a contar ahora :o) First of all, Im so glad I had the opportunity to take these photographs in one of the mo ...

DIY Scrap Tag Scrapbooking

¡Hola! Aquí estoy de nuevo con un proyecto de inspiración como miembro del DT de Kora Projects. En ocasiones tenemos que envolver un regalo para un bebé pero no tenemos el papel apropiado ¿qúe hacer? Hi!, here I am again with an inspiration project that I show you as a member of Kora Projects DT. Sometimes, we have to wrap a present for a baby but we dont have the right paper for the occasion. W ...

pages/páginas Mini Albums Makers JV/СП ...

Hi everyone! Ive made another mini album following Natalia Ruskos tutorial for Velenacraft JV. This was the first time Ive seen a "Russian style" mini album tutorial in my lenguage by a Russian. Im so glad! You dont need to know Spanish to see the tutorials. So take a look at them accounts and see their beautiful craft works! For the cover I used two different fabrics and sewed them ...

Agiart dies Album Boda/wedding ...

Hi everyone! Today Im gonna show you this shabby album to keep the photo memories! Ive used the collection "Beautiful memories" from Scrapmir, so pink and shabby!! I made a shaker for the cover These are pages nº 1 and 2 A big frame for the first page And inside a big pocket for keep photos, cards... A shaker closure for the second page Third and fourth pages I made this f ...

Costura/sewing DT Gypsy Soul Laser Cuts Heritage ...

Hello everyone! Today Im gonna show you this shabby notebook to keep memories! I used this exquisit chipboard "Lace frame" from Gypsy Soul Laser Cuts for the cover. I painted it with acrylic pink and white paint. I embroidered a letter with small flowers, and I done a small sack filled with wadding. Once finished I fitted it into the frame and sticked it with a resistant glue. Thi ...

Agiart dies Album Bee Shabby ...

Hi everyone! Today Im gonna show you this train shape album to keep the memories of winter This is the most complicated shape Ive binded with suede, but i got it! The small pieces are covered with faux leather. I used the window to make a shaker, not just for the title Only the front wheels turn :) so funny! I used this train base from Velenacraft store, "Shabby winter" papers and ...

scrapbooking

Hola creador@s! Tengo el honor de tener en mi casa virtual una artista internacional, ella es Wilna Furstenberg, estoy feliz de tenerla por aquí, la descubrí en instagram y me quedé asombrada de su gran talento. Os dejo con una pequeña descripción de ella: I have the honor of having an international artist in my virtual house, she is Wilna, I am happy to have her around here, I discovered her on ...

art journal Design Teams DISEÑADORA ...

Hola a tod@s! Os habéis notado cuanto me gusta Alisa del país de las maravillas? Aún no? Con esta página del art journal os lo confirmo una vez más! :))) Hi everybody! How the things are going? :) Have you noticed how I like Alise in wonderland? Not yet? This page of my art journal confirms it to you once again! :))) El proyecto lo hice para nuestro RETO en Scrap Around The World inspirándome en e ...