La irresistible tarta de galletas / An irresistible cookies cake

¡Feliz año nuevo! ¿Estáis preparadas para el 2014? Deseo que este año sea próspero para todos. Y que mejor manera de empezar que con una deliciosa receta. ¿Tenéis algún plato especial que no podáis dejar de comer hasta que os lo habéis acabado? El mío es la tarta de galletas, ¿Y el vuestro? Cuando la preparo sueño con su sabor y me es difícil encontrar el momento para parar de comer. Aunque no soy la única que se siente así, incluso mi pareja tampoco puede resistirse a seguir comiendo hasta que se acaba. Os advierto que esta receta es adictiva, no me responsabilizo si hacéis vuestro pastel y os lo coméis de una sentada. ¡Comenzamos!

Ingredientes que necesitaréis para la tarta:

200g de nata montada (con un mínimo del 35% de materia grasa)

80g de azúcar glass

750g de crema pastelera de chocolate (Los ingredientes necesarios para hacerla son: 100g de azúcar, 500g de leche, 50g de maicena, 3 huevos, 1 churadita de vainilla y 30g de cacao puro en polvo)

2 paquetes de galletas rectangulares (tipo tostadas)

1 bol con leche y tres cucharaditas de cacao puro en polvo

2 moldes rectangulares pequeño de cerámica o vidrio de 20x15cm o uno grande

Preparando la tarta:

1. Primeramente montamos los 200g de nata con unas varillas y cuando quede poco para acabar añade el azúcar glass. Cuando la nata este totalmente montada resérvala en la nevera.

2. Ahora haz la crema pastelera de chocolate. Pon todos los ingredientes en la thermomix y programa 7 minutos, 90º, velocidad 4. Una vez lista, déjala enfriarse en un bol cubierto con un film transparente.

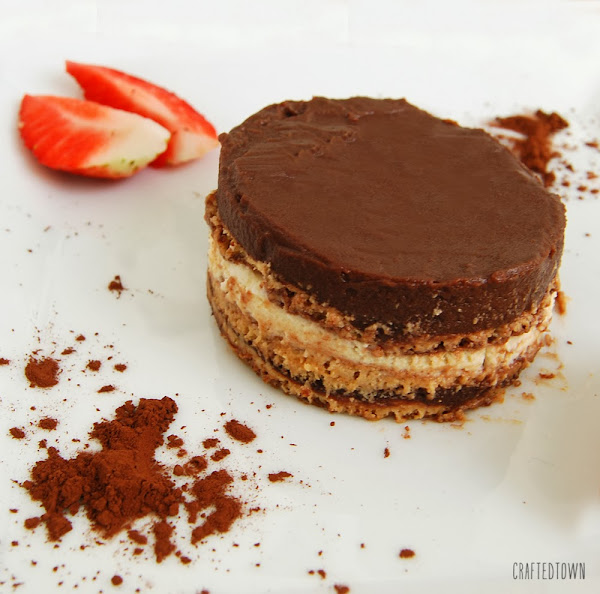
3. Cuando la crema pastelera de chocolate este fría es el momento de montar la tarta. Prepara un pequeño bol con leche y añade 3 cucharaditas de cacao puro en polvo y remuevelo bien. Ahora moja las galletas en la mezcla y ves poniéndolas en el molde hasta cubrir la base con ellas. A continuación extiende una capa de crema pastelera de chocolate y cúbrela otra vez con una capa de galletas mojas en leche, encima de esta capa de galletas extiende una capa de nata montada y vuelve a cubrir con  con una capa de galletas otra vez. Finalmente extiende una última capa de crema pastelera de chocolate y déjalo reposar en la nevera durante un par de horas tapado con film transparente. Si habéis utilizado dos moldes pequeños repite este proceso de nuevo.

Después de un par de horas es el momento de probarla, no me responsabilizo si os volvéis adictas, os he aviso al principio.

¡A disfrutar de vuestra tarta!


...............................................

Happy New Year! Are you ready for the 2014? I hope it will be a prosperous year for everybody and the best way to begin is with a delicious recipe. Do you have any special dish you won"t stop eating till it was finished? I have a one, it"s a cookie cake, and you? When I prepare it, I dream with its tasty and feel difficult to find the moment to stop eating it. Although I"m not the only one who feel in that way, my boyfriend also cannot resist to eat it till the end of it. I warn you that this recipe it"s so addictive, I"m not responsible if you make your cake and also cannot stop eating until it will be finished. Let"s begin!

Ingredients you will need for the cake:


200g whipped cream (minimum of 35% of grease)

80g icing sugar

750g chocolate cream (The ingredients needed for cook it are: 100g sugar, 500g milk, 50g cornflour, 3 eggs, 1 teaspoon vanilla and 30g of cocoa powder)

2 packs of rectangular cookies (toast type)

A bowl with milk and 3 teaspoons of cocoa powder

Two little rectangular glass or ceramic moulds of  20x15cm or a big one

Preparing the cake:

1. First whip the 200g of cream with a blender and when it will be almost ready add the icing sugar. When the cream it"s whipped reserve it in the fridge.

2. Now cook the chocolate cream. Pour all the ingredients in your thermomix and program 7 minutes, 90º and speed 4. When it"s ready, let it get cold into a bowl cover with a cling film.

3. When the chocolate cream is cold it"s time to make the cake. Prepare a little bowl with some milk and pour 3 teaspoons of cocoa powder and mixed them well. Now dip every cookie into it and put them in the mould till you have the base cover up. Then spread a layer of chocolate cream and cover it again with a layer of milk wet cookies, onto this layer of cookies spread another layer of whipped cream and cover again with cookies. Finally spread a layer of chocolate cream and put it into to the fridge for a couple of hours cover with cling film. If you are using two little moulds, repeat the process again.

After the couple of hour it"s time to taste it, I"m not responsible if you become an addictive, I have warned you at the beginning ;)

Enjoy your cake!

Fuente: este post proviene de craftedtown, donde puedes consultar el contenido original.
¿Vulnera este post tus derechos? Pincha aquí.
Modificado:
¿Qué te ha parecido esta idea?

Esta idea proviene de:

Y estas son sus últimas ideas publicadas:

Recomendamos

Relacionado

ideas diy carrot cake pastel de zanahorias ...

¡Hola a todos! ¿Cómo os ha ido el fin de semana? Yo he estado celebrando el cumpleaños de un amigo de mi pareja y esa fue la excusa para ofrecerme a hacer el pastel de cumpleaños. Los pasteles favoritos del cumpleañero son los tiramisus y los pasteles de zanahoria, así que escogí hacer el de zanahorias porque quería darle otra oportunidad. Hace unos meses, cociné uno para probarlo y no me gusto mu ...

patchwork libro

A ver q os parece este tutorial, es un libro de alfileres, espero q os guste dirección de la persona q ha realizado el tutorial: http://www.kitskorner.com/2012/20-awesome-needle-book-tutorials/#!prettyPhoto You"ll need: 12- 1.5" fabric squares in assorted prints for patchwork back 1- base fabric for front: 3.5" x 4.5", appliqued/embroidered any way you like 1- strip of fabric ...

general crochet diy ...

Siguiendo con la sección de Ikea hacks que inauguré con estos bonitos lápices, hoy os propongo una idea muy sencilla para hacer con trapillo: una funda de ganchillo para el taburete BEKVÄM de Ikea. Hace tiempo que tengo el taburete en mi habitación y aunque nada más comprarlo le dí una capa del tinte BEHANDLA, me parecía que le faltaba algo para integrarse con la decoración. Así que decidí hacer ...

Autumn Daily Scrapbooking TUTORIALES ...

De nuevo estoy aquí con un tutorial, en esta ocasión un álbum para documentar estos días, será mi Diario de Otoño. Para realizarlo he usado el Álbum Casa con ventana de Kora Projects ya que es muy fácil trabajar con él y el resultado me encanta. Im here one more time with a tutorial. In this ocassion, Its an album that I will use for collect the fall days. Ive used the Album house with window ...

DT Kora Projects Kora Projects papers mini album ...

Hello everyone! Summer still hasnt gone so you take advantage! Today Im going a show you how to make a super mini album with only three scrap papers and a lot of imagination. (Tutorial en Español aquí) Supplies that you will need: -4 white cardstock pieces of 2 15/16"x3 3/4" -Cardboard -"Sea Time" back cover -"Comunión Niño - Buen viaje" -"Sea Time - Ocean frien ...

pages/páginas Mini Albums Makers JV/СП ...

Hi everyone! Ive made another mini album following Natalia Ruskos tutorial for Velenacraft JV. This was the first time Ive seen a "Russian style" mini album tutorial in my lenguage by a Russian. Im so glad! You dont need to know Spanish to see the tutorials. So take a look at them accounts and see their beautiful craft works! For the cover I used two different fabrics and sewed them ...

costura handbox hogar (home)

Hola a tod@s Hoy me gustaría enseñaros unos posavasos que he hecho utilizando palitos de helado y cinta washi tape. Son muy sencillos de hacer e incluso podría ser una manualidad para compartir un ratito de nuestro tiempo con los niños. Today I would like to show you a few coasters that I"ve done using ice-cream sticks and washi tape. They are very simple to make and we could even make it wit ...

papel asoi design teams ...

Hola a tod@s! Ha llegado el momento para terminar el libro de firmas para los novios de Líbano :) Os enseñaré la portada y todas las páginas que lleva. Los materiales fueron comprados en la tienda on-line A Sprinkle Of Imagination especializada en productos para Mixed Media. Fue un enorme placer hacerlo, porque mi querida amiga Nadiya me dió la total libertad cuando me lo encargó para la boda de s ...

Scrap álbumnes Scrapbooking TUTORIALES

Hola !!! Para esta colaboración con Kora Projects he preparado un mini álbum Pop Up que además, puedes usar como decoración en cualquier rincón de tu casa. Hi !!! For this collaboration with Kora Projects I have prepared a Pop Up mini album wich in adittion, you can use it like decoration in any corner of your house. Para realizarlo he usado estos materiales: 2 Cartones contracolados 21,5 x ...