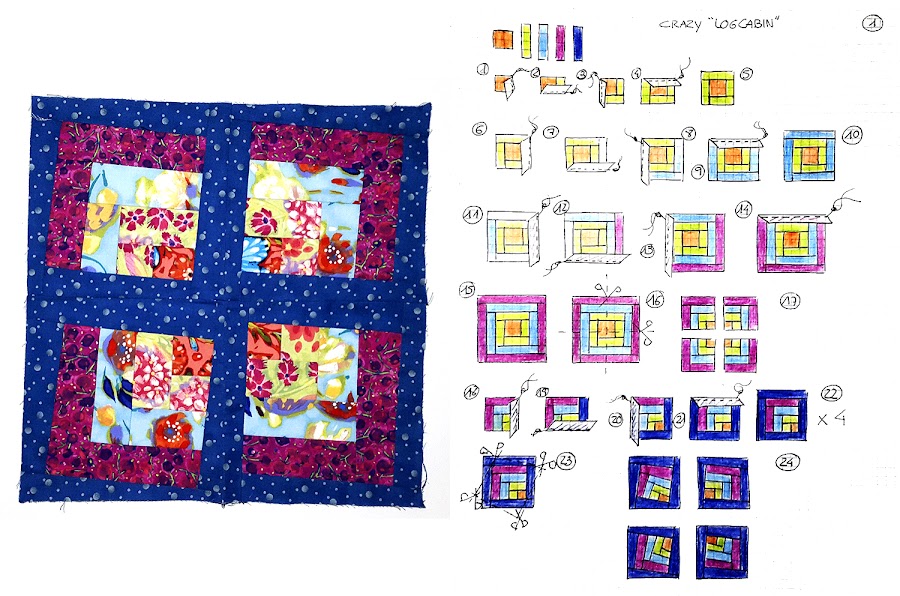
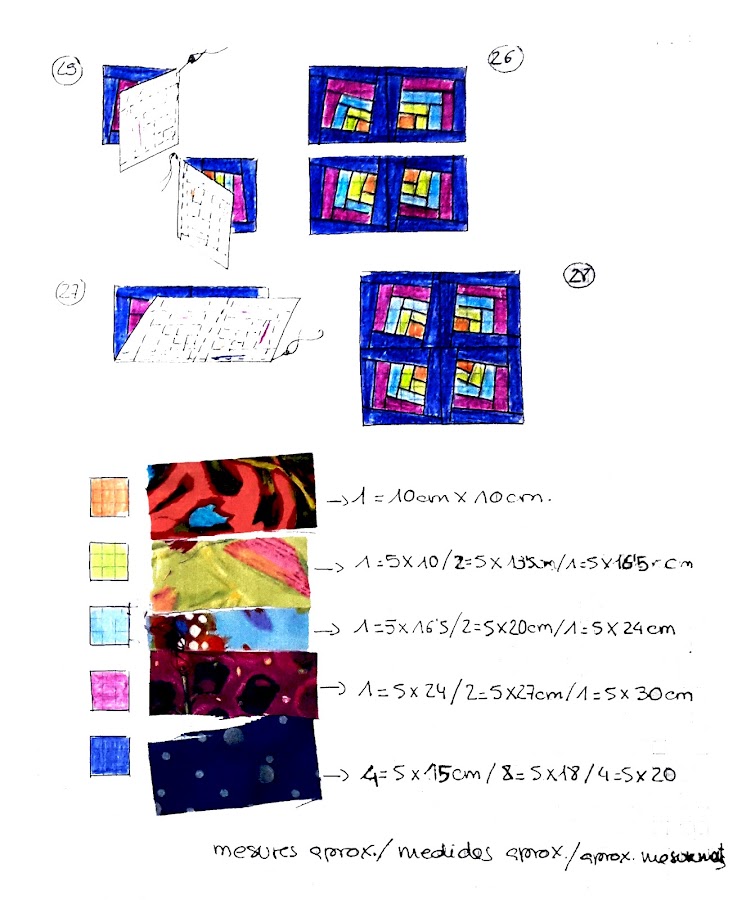
Com ja és habitual us deixem les mesures en l’annex, però us recomanem que aneu ajustant les tires, pas a pas, tal com aneu avançant el treball; de tota manera farem servir les quantitats que tenim, per les explicacions.
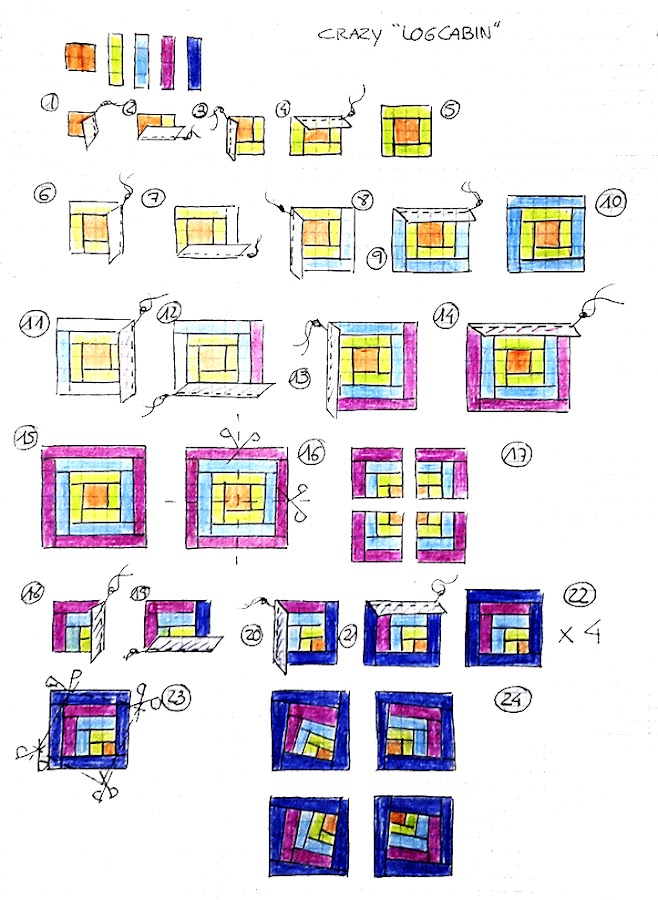
Comencem el tutorial. Necessitem 5 teles d’estampat o color diferent. Començarem amb un quadrat de 10cmX10cm per fer la base del nostre Log Cabin. La resta de teles seran tires de 5cm d’ampla de diferent llargària, que anirem ajustant, com hem dit més amunt; tingueu en compte que necessitarem més quantitat de la tela que farem servir per a les voltes finals. El primer que farem serà cosir una tira de 5cmX10cm a un costat del quadrat base (1); continuarem afegint les tires al voltant de la base, ajustant la mesura (2,3,4); ja tenim la primera volta (5). La segona volta la comencem igual que la primera: cosim una tira de 5cmX16’5 (més o menys; ajusteu-la al vostre bloc) a un costat (6) i acabem la segona volta cosint al voltant les altres tres tires (7,8,9). Segona volta feta (10). Repetim les mateixes passes per fer la tercera volta, començant amb una tira de 5cmX24cm més o menys (11, 12, 13, 14). Ja tenim el bloc base acabat (15).
Comencem la segona part del tutorial. Agafem el blocobtingut i el tallem per la meitat en horitzontal i en vertical (16); ara tenim quatre Log Cabin (17). A cada un d’ells cosirem quatre tires, de la tela que haguem escollit com a remat final, repetint la rutina anterior. Cosim la primera tira de 5cmX15cm o de la llargària del vostre mini bloc a un costat del Log Cabin (18); continuem cosint les altres tres tires fins a tenir tot el mini bloc envoltat (19,20,21). Ho repetim amb la resta de Log Cabin, fins a tenir quatre (22).
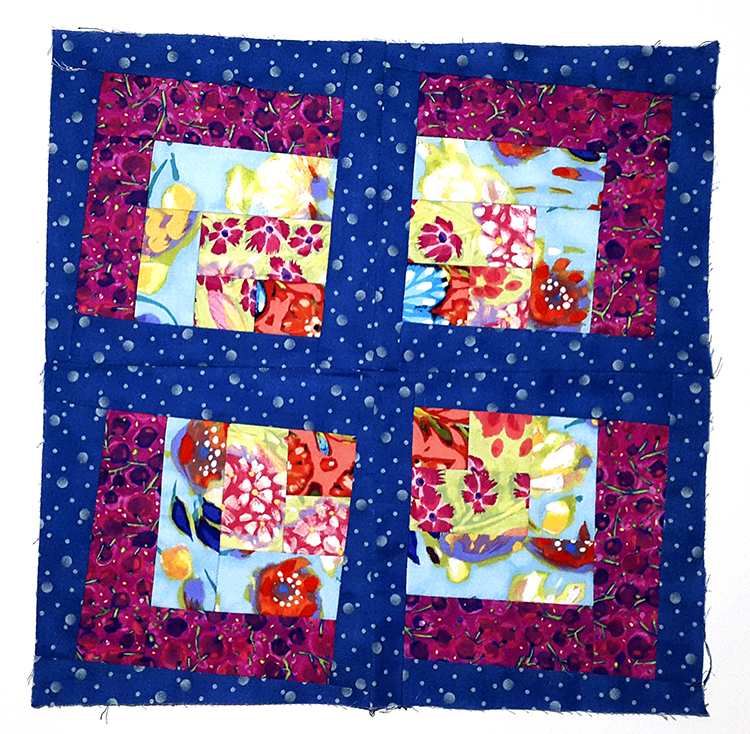
Ara comença la part divertida i esbojarrada. Agafarem cada un dels mini blocs i retallarem de manera que el centre ens quedi desplaçat. Podem girar una mica i a partir d’aquí retallar un quadrat (23); ho fem amb tots. Nosaltres hem retallat primer un i després hem sobreposat els altres i hem fet el mateix tall, però es pot fer cada un diferent, respectant que la mesura del quadrat sigui la mateixa. Disposem els Log Cabin retorçats com veieu al dibuix (24) i els unim com ja és habitual: cosim els dos mini blocs de dalt i els dos d’abaix entre ells (25) i, les dues tires obtingudes(26), les cosim entre elles (27). Per fi tenim el nostre bloc acabat (28).
Aquesta idea és genial per fer coixins o si feu diferents blocs, jugant amb el desplaçament dels Log Cabin, fer una vànova molt divertida. Esperem que us agradi la idea i us inspiri labors espectaculars.
CADA UN PER LA SEVA BANDA!!!
CRAZY LOG CABIN: TUTORIAL DE PATCHWORK.
El nuevo tutorial de patchwork que Les Antònies os presentamos está inspirado en una idea que vimos al nº 29 de la revista inglesa Love Patchwork & Quilting. Nos gustó mucho y nosotras hemos hecho nuestra versión, por eso os dejamos el tutorialdibujado de cómo lo hemos realizado.
Cómo ya es habitual os dejamos las medidas en el anexo, pero os recomendamos que valláis ajustando las tiras, paso a paso, tal como avancéis en el trabajo; de todas maneras usaremos las cantidades que tenemos, para las explicaciones.
Empezamos el tutorial. Necesitamos 5 telas de estampado o color diferente. Empezaremos con un cuadrado de 10cmX10cm para hacer la base de nuestro Log Cabin. El resto de telas serán tiras de 5cm de ancho de diferente longitud, que iremos ajustando, cómo hemos dicho más arriba; tened en cuenta que necesitaremos más cantidad de la tela que usaremos para las vueltas finales. Lo primero que haremos será coser una tira de 5cmX10cm a un lado del cuadrado base (1); continuaremos añadiendo las tiras alrededor de la base, ajustando la medida (2, 3, 4); ya tenemos la primera vuelta (5). La segunda vuelta la empezamos igual que la primera: cosemos una tira de 5cmX16’5 (más o menos; ajustadla a vuestro bloque) a un lado (6) y acabamos la segunda vuelta cosiendo alrededor las otras tres tiras (7, 8, 9). Segunda vuelta hecha (10). Repetimos los mismos pasos para hacer la tercera vuelta, empezando con una tira de 5cmX24cm más o menos (11, 12, 13, 14). Ya tenemos el bloque base acabado (15).
Empezamos la segunda parte del tutorial. Cogemos el bloque obtenido y lo cortamos por la mitad en horizontal y en vertical (16); ahora tenemos cuatro Log Cabin (17). A cada uno de ellos coseremos cuatro tiras, de la tela que hayamos escogido como remate final, repitiendo la rutina anterior. Cosemos la primera tira de 5cmX15cm o de la longitud del vuestro mini bloque a un lado del Log Cabin (18); continuamos cosiendo las otras tres tiras hasta tener todo el mini bloque rodeado (19, 20, 21). Lo repetimos con el resto de Log Cabin, hasta tener cuatro (22).
Ahora empieza la parte divertida y alocada. Cogeremos cada uno de los mini bloques y recortaremos de forma que el centro nos quede desplazado. Podemos girar un poco y a partir de aquí recortar un cuadrado (23); lo hacemos con todos. Nosotras hemos recortado primero uno y después hemos sobrepuesto los otros y hemos hecho el mismo corte, pero se puede hacer cada uno diferente, respetando que la medida del cuadrado sea la misma. Disponemos los Log Cabin retorcidos cómo veis en el dibujo (24) y los unimos como ya es habitual: cosemos los dos mini bloques de arriba y los dos de abajo entre ellos (25) y, las dos tiras obtenidas (26), las cosemos entre ellas (27). Por fin tenemos nuestro bloqueacabado (28).
Esta idea es genial para hacer cojines o si hacéis diferentes bloques, jugando con el desplazamiento de los Log Cabin, hacer una colcha muy divertida. Esperamos que os guste la idea y os inspire labores espectaculares.
¡¡¡CADA UNO POR SU LADO!!!
CRAZY LOG CABIN: PATCHWORK TUTORIAL.
The new patchwork tutorial that Les Antònies are presenting to you is inspired by an idea that we see in the No. 29 of the English magazine Love Patchwork &Quilting. We really liked and we made our version, so we leave the outlined tutorial how we performed.
As usual here are the measures in the annex, but we recommend that you go by adjusting the strips, step by step, as we go forward the work; anyway we will use the quantities that we have, to the explanations.
We start the tutorial. We need 5 stamping or different colour fabrics. We will start with a square of 10cmX10cm to make the basis of our Log Cabin. The rest will be 5cm wide strips of fabric of different length, which we will be adjusting, as mentioned above; please note that we will need more of the fabric that we will use for the final laps. The first thing we will sew a strip of 5cmX10cm on one side of the square base (1); we will continue adding strips around the base, by adjusting the extent (2, 3, 4); we already have the first lap (5). The second round start as the first: sew a strip of 5cmX165 (more or less; adjust it on your block) on one side (6) and just the second round sewing around the other three strips (7, 8, 9). Second round made (10). Repeat the same steps to make the third round, starting with a strip of more or less 5cmX24cm (11, 12, 13, and 14). We already have the finished base block (15).
We started the second part of the tutorial. Take the block retrieved from and cut it in half horizontally and vertically (16); now we have four Log Cabins(17). In each one of them we sew four strips, of the fabric that we have chose to end the end, repeating the previous routine. Sew the first strip of 5cmX15cm or the length of your mini block on one side of the Log Cabin (18); continue sewing the other three strips to have all the mini block surrounded by (19, 20,21). So we repeat with the rest of the Log Cabins, up to four (22).
Now begins the fun and crazy part. Take each of the mini blocks and cut it so that the centre is moved. We can rotate a bit from here and cut a square (23); we do this with all. We cut the first one and then we have the overlap the others and we have cut the same edge, but you can make each one different, respecting the extent of the square is the same. We have the twisted Log Cabin as you can see in the drawing (24) and join as usual: sew the two mini blocks above and the two below with each other (25), and the two strips obtained (26), sew between them (27). Finally we have our finished block (28).
This idea is great to make pillows or if you make different blocks, playing with the displacement of the Log Cabin, make a fun quilt. We hope you like the idea and inspire dramatic work.
EACH ONE BY ITS HAND!!!


