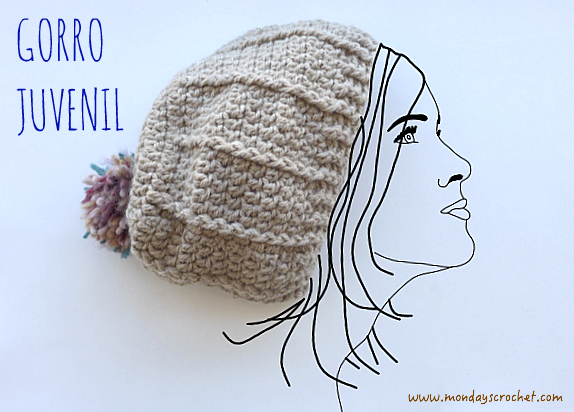
A cap is a very personal garment. There are people who cannot live without them and others who need them. We will show you this young model with a light “fallen” effect with a pom pom that will become a must this winter.
Nuestro gorro caído con pompón esconde una idea: APROVECHAR TODOS ESOS TROZOS DE LANA QUE NO SABEMOS CÓMO EMPLEAR PARA HACER UN POMPÓN.
We use the wool left overs for the pom pom.
TUTORIAL PARA UN GORRO DE DIÁMETRO 52 cm Y 23 cm DE ALTO / TUTORIAL FOR A HAT WITH DIAMETER 52 cm by 23 cm
GRADO DE DIFICULTAD
Medio
MATERIALES
1 ovillo de 50 gr de lana para tejer con aguja número 5
Trozos de lana pequeños
Aguja utilizada número 5
Aguja lanera
Cartón de 8 cm de diámetro o máquina para hacer pompones
Tijeras
PUNTOS DE CROCHET UTILIZADOS
Anillo mágico
Punto corredizo (p.c.)
Punto alto (p.a.)
Punto alto en relieve tejido por delante (p.a.rel.del.)
Punto alto en relieve tejido por detrás (p.a.rel.det.)
DIFFICULTY
Medium
MATERIALS
1 ball of wool of 50 gr for hook nº 5
Short threads of wool (lefties)
Use hook nº 5
Wool needle
Cardboard of 8 cm of diameter or pom pom maker
Scissors
CROCHET STITCHES
Magic ring
Slip Stich (sl st)
Double crochet (dc)
Front post double crochet (FPdc)
Back post doble crochet (BPdc)

Vamos a hacer nuestro gorro en 4 pasos. El primer paso sería tejer de forma circular las vueltas inicial a 6. El segundo paso es hacer el dibujo de nuestro gorro sin aumentar, vueltas 7 a 16. El siguiente paso es tejer un elástico de 2 vueltas y por último y opcional, hacer un pompón.
There are 4 steps to complete the hat . The first step would be to do a circle from foundation row to row 6. The second step is to do the hat without increase stitches, rows 7 to 16. The next step is to do the elastic, last 2 rows, and finally to do the pom pom.
PASO 1. TEJER DE FORMA CIRCULAR / STEP 1. DO A CIRCLE

VUELTA INICIAL: Anillo mágico.
VUELTA 1: Tejer 3 c.a.d. de subida que cuentan como 1 p.a. Hacer 9 p.a. Cerrar con 1 p.c. En total 10 p.a.
STARTING ROW: Magic ring.
ROW 1: 3 ch (counts as first dc). 9 dc. Finish off with 1 sl st. 10 dc in total.

VUELTA 2: Tejer 3 c.a.d. de subida que cuentan como 1 p.a. Hacer 9 p.a. dobles en cada p.a. de la vuelta anterior. Cerrar con 1 p.c. En total 20 p.a.
ROW 2: 3 ch (counts as first stitch) 9 double dc in each stitch of the previous row. Finish off with sl st. 20 dc in total.

VUELTA 3: Tejer 3 c.a.d. de subida que cuentan como 1 p.a. y 1 p.a. en el mismo p.a. de la c.a.d. de subida, 1 p.a., 2 p.a. juntos, 1 p.a. Repetir y cerrar con 1 p.c. En total 30 p.a.
VUELTA 4: Tejer 3 c.a.d. de subida que cuentan como 1 p.a. y 1 p.a. en el mismo p.a. de la c.a.d. de subida, 2 p.a., 2 p.a. juntos, 2 p.a., 2 p.a. juntos. Repetir y cerrar con 1 p.c. En total 40 p.a.
VUELTA 5: Tejer 3 c.a.d. de subida que cuentan como 1 p.a. y 1 p.a. en el mismo p.a. de la c.a.d. de subida, 3 p.a., 2 p.a. juntos, 3 p.a., 2 p.a. juntos. Repetir y cerrar con 1 p.c. En total 50 p.a.
VUELTA 6: Tejer 3 c.a.d. de subida que cuentan como 1 p.a. y 1 p.a. en el mismo p.a. de la c.a.d. de subida, 4 p.a., 2 p.a. juntos, 4 p.a., 2 p.a. juntos. Repetir y cerrar con 1 p.c. En total 60 p.a.
ROW 3: 3 ch to start the row (count as first dc) and 1 dc in the same dc, 1dc, 2 dc together, 1dc. Repeat and finish off with sl st. 30 dc in total.
ROW 4: 3 ch to start the row (count as first dc) and 1 dc in the same dc, 2dc, 2 dc together, 1dc. Repeat and finish off with sl st. 40 dc in total.
ROW 5: 3 ch to start the row (count as first dc) and 1 dc in the same dc, 4dc, 2 dc together, 1dc. Repeat and finish off with sl st. 50 dc in total.
ROW 6: 3 ch to start the row (count as first dc) and 1 dc in the same dc, 4dc, 2 dc together, 1dc. Repeat and finish off with sl st. 60 dc in total.
PASO 2. TEJER UN DIBUJO DE PUNTOS SIN AUMENTAR / MAKE A PATTERN WITHOUT INCREASE
Para este modelo tan juvenil hemos elegido el dibujo de líneas de relieve en vertical. Tejeremos un punto alto en relieve por delante cada 5 puntos altos.
We have chosen this a pattern with vertical ridges. Make a front post double crochet every five stitches.

VUELTAS 7 a 16: Tejer 3 c.a.d. de subida que cuentan como 1 p.a., 1 p.a. en el siguiente p.a. de la vuelta anterior, 1 p.a.rel.del. Con el criterio de tejer el p.a. inmediato al p.a.rel.del., 5 p.a. en los siguientes p.a.,1 p.a.rel.del., 5 p.a. Repetir hasta terminar la vuelta con 3 p.a. Cerrar con i1 p.c.
ROWS 7 to 16: Make 3 ch to start the row that counts as 1 dc, 1 dc in the next dc of the previous row, 1 FPdc. With the criteria of making the first stitch immediately after the FPdc,1 FPdc., 5 dc. Repeat until finish the row with 3 dc. Finish off with 1 sl st.

PASO 3. PUNTO ELÁSTICO / ELASTIC STITCH

VUELTAS 17 y 18: Tejer 3 c.a.d. de subida que cuentan como 1 p.a. 1 p.a.rel.det. Para hacer coincidir las líneas de relieve del dibujo del gorro el siguiente punto será 1 p.a.rel.del., 1 p.a.rel.det., 1 p.a.rel.del. Repetir hasta completar el diámetro y cerrar con 1 p.c.
ROWS 17 and 18: Make 3 ch to start the row that counts as 1 dc, 1 FPdc. To match the lines, next stitch will be 1 FPdc, 1 BPdc, 1FPdc. Repeat until complete the diameter and fasten off with 1 sl st.
En el siguiente vídeo podréis ver cómo se hace un elástico de crochet:
In the next video you can see how to make the elastic:
Podéis dejar el gorro terminado en este momento sin pompón.
You can finish here or continue on and make the pom pom.

PASO 4. POMPÓN / POM POM
Para hacer el pompón hemos tenido la idea de aprovechar trozos de ovillos de lanas sobrantes y crear un pompón multicolor. Os contamos el proceso paso a paso:
1. Dibujamos sobre un cartón una circunferencia exterior de 8 cm de diámetro y otra interior de 2 cm y cortamos por las dos marcas. Repetimos y hacemos otro igual.
2. Unimos ambos cartones y les hacemos un corte desde el centro al extremo.
3. Pasamos la lana por la ranura, desde el exterior al interior y completamos 3 vueltas.
To make the pompom we had the idea of taking the remaining wools of other projects and creating a multicolored pompom. This is the process step by step:
1. Draw on a piece of cardboard a circle circumference of 8 cm diameter and an interior of 2 cm and cut out as in the diagram below. Make 2 of these.
2. Join both cartons and make a cut between the 2 circles (see diagram).
3. Pass the wool though the cut, from the exterior to the interior and wrap 3 times.

4. Cortar con unas tijeras la lana entre los dos cartones.
4. Using scissors cut the wool between both cardboards (see diagram below).

5. Con mucho cuidado de no perder trozos de lana, introducir un cabo entre los cartones y hacer un nudo fuerte en el interior del pompón.
5. With care to avoid the wool separating, introduce a piece of wool between the 2 pieces of cardboard and make a strong knot inside the pom pom.

6. Retirar los cartones.
7. Enhebrar una aguja y rematar fuertemente.
6. Remove the cardboard.
7. Thread a needle and make the knot more tight.

8. Repartir la lana por todo el pompón y recortar los cabos más largos.
8. Distribute the wool for the whole pom pom and cut any extruding ends.
Hemos terminado nuestro pompón de colores.
Our colorful pom pom is finished.
Este juvenil modelo puede ser para niños, jóvenes, hombre o mujer, cambiando simplemente el color de tu lana.
This young model can be for children, young people, men or women, simply by changing the color of your wool.

Fuente: este post proviene de este blog, donde puedes consultar el contenido original.
¿Vulnera este post tus derechos? Pincha aquí.
Creado: